Affiliate Disclaimer: This post may contain affiliate links. This means that I may earn a commission if you make a purchase through these links. I only recommend products and services that I personally use and believe will add value to my readers. Your support helps keep this blog running and is greatly appreciated. Thank you!
So, you’ve come to the end of your knitting project, bound off the last of your stitches, and are now wondering what on earth to do with all those loose, dangling strands that are keeping your project from looking ‘complete’. Well, you’ve come to the right place, my friend! In this article, I’ll walk you through the various ways in which you can neatly and securely weave in the ends of your knitting project so you can finally show off your beautiful creation. So without further ado, let’s get started!
WEAVING ENDS INTO A SEAM
First things first, if you’ve got a seam – use it! As I briefly mentioned in the article I wrote on how to join a new ball of yarn to your knitting, the neatest solution to hiding all those dangling ends is to simply join your yarn where you know there will be a seam once you’ve finished knitting your project. This will ensure that you’ve got a nice, sturdy place to effectively hide those ends, and really – it can’t get much simpler than that!
Of course, the same can be said for areas of your knitting where you’ve picked up stitches. Although technically not a seam, per se, the edge that is created on the wrong side of your fabric when picking up stitches pretty well acts as a faux seam. Thus, you can use this edge to weave in ends just as you would a regular ‘ol seam.
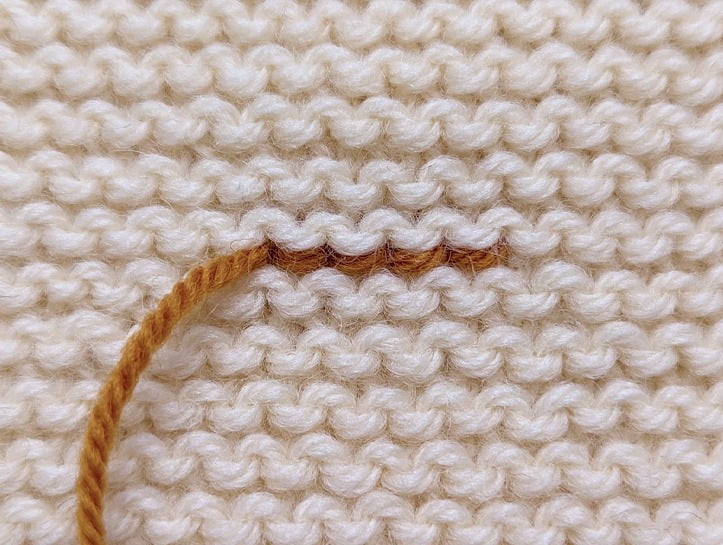
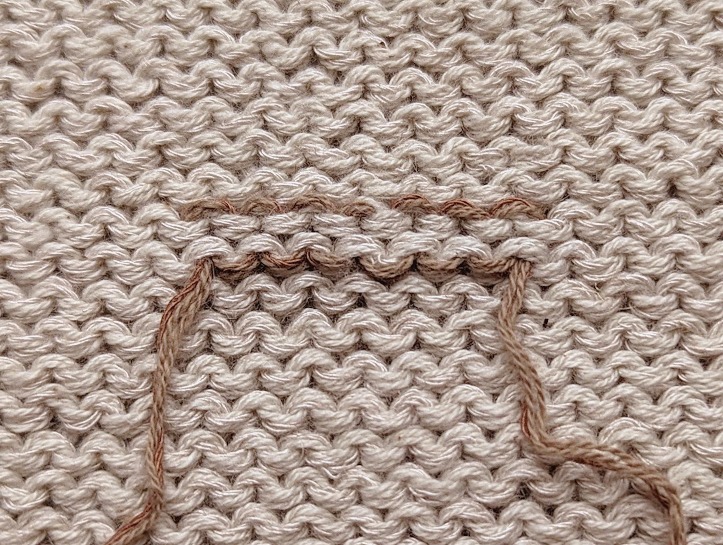
That said, real seam or faux seam – it really doesn’t matter how you weave your ends into them. Just make sure that you’ve got enough of that end in so that it stays put and has nowhere to go. Below is an example of how I would typically go about it.
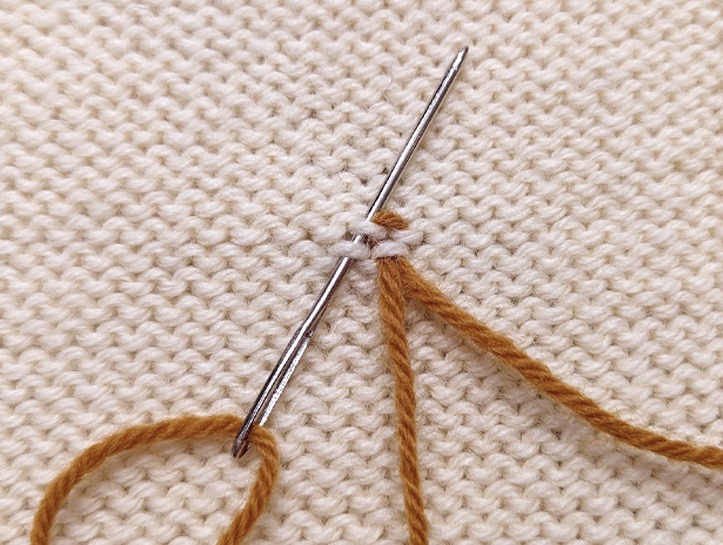
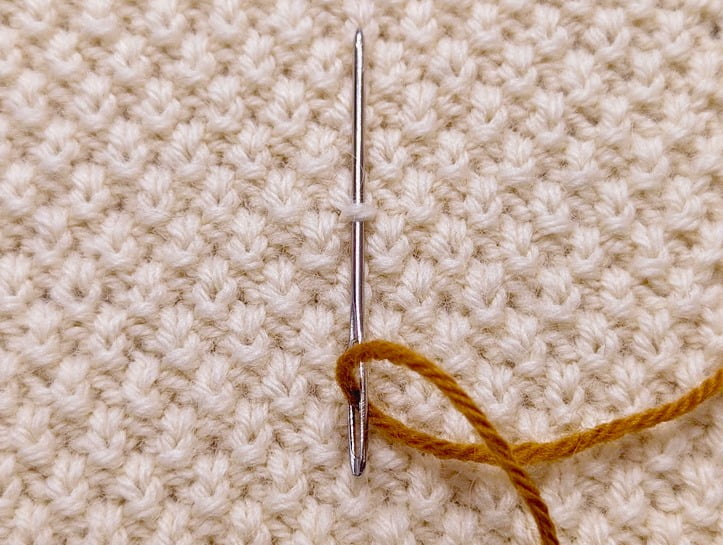
Step #1:
Insert your tapestry needle underneath several horizontal strands within your seam. Pull the end through.
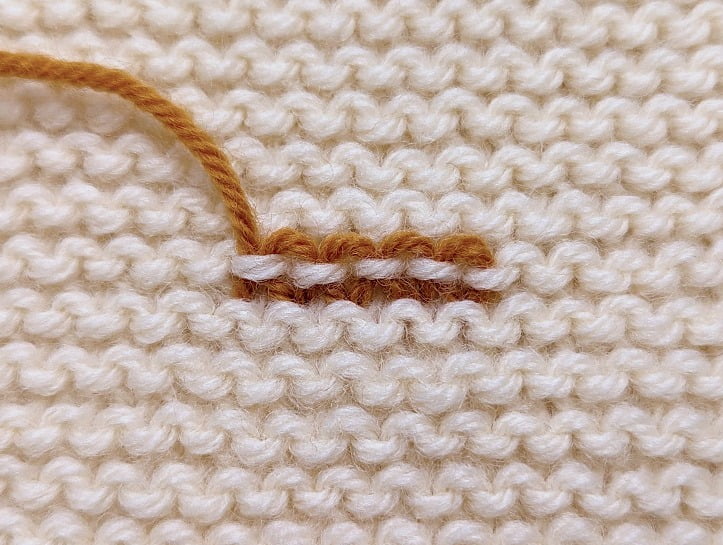
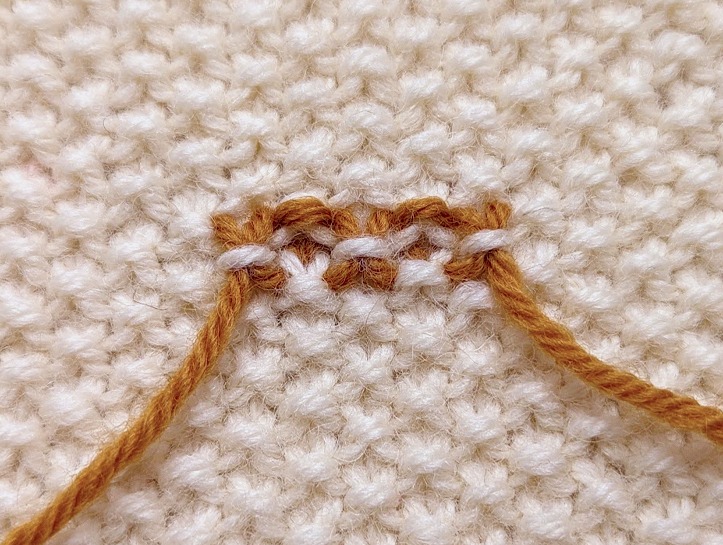
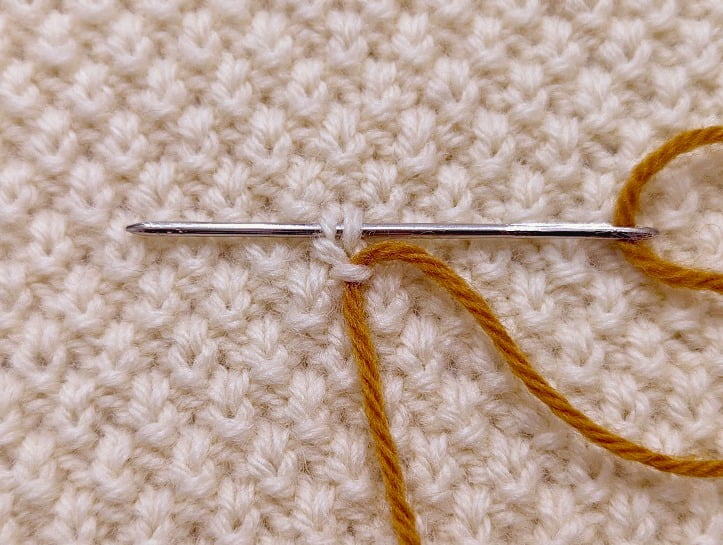
Step #2:
Insert your tapestry needle underneath an adjacent ‘V’. Pull the end through.
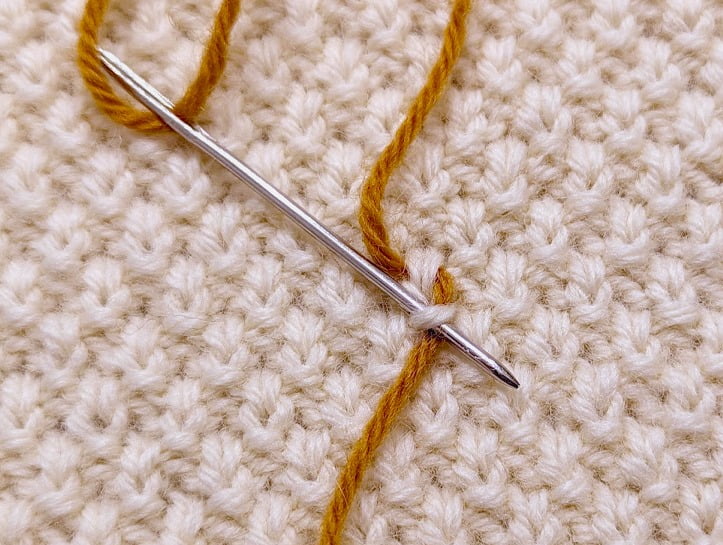
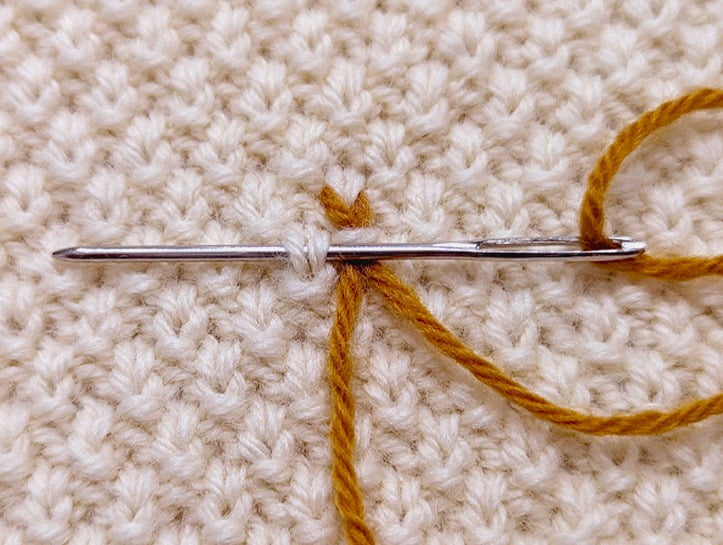
Step #3:
Insert your tapestry needle into the adjacent column of stitches, in the opposite direction. Pull the end through.
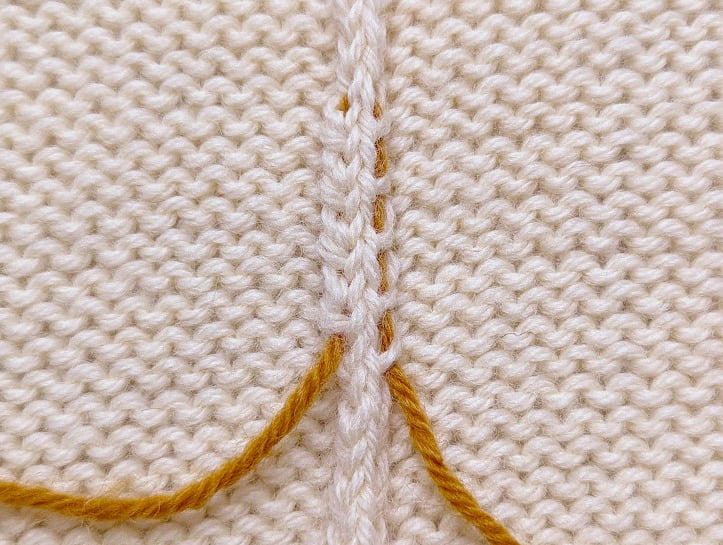
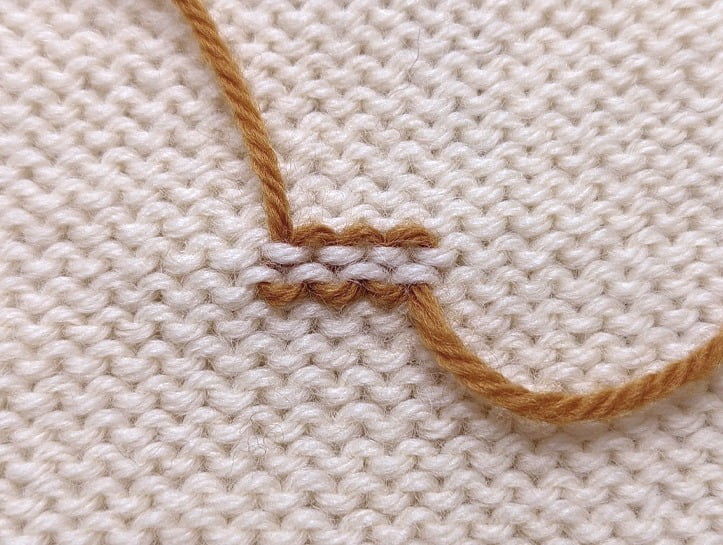
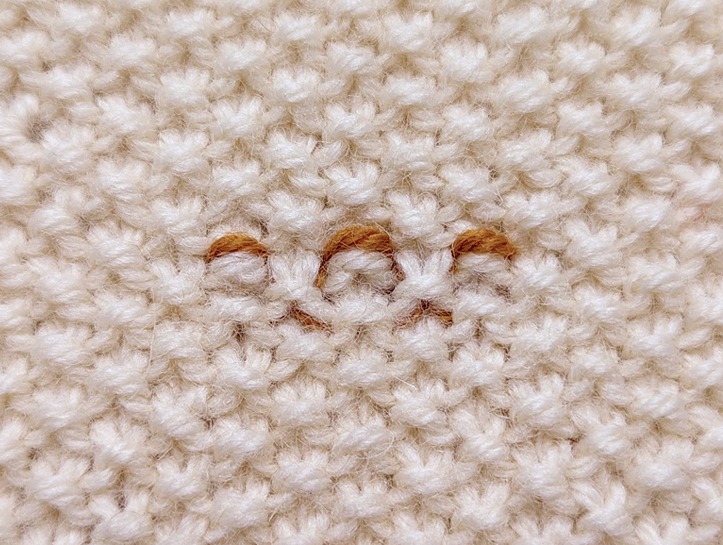
Wrong Side
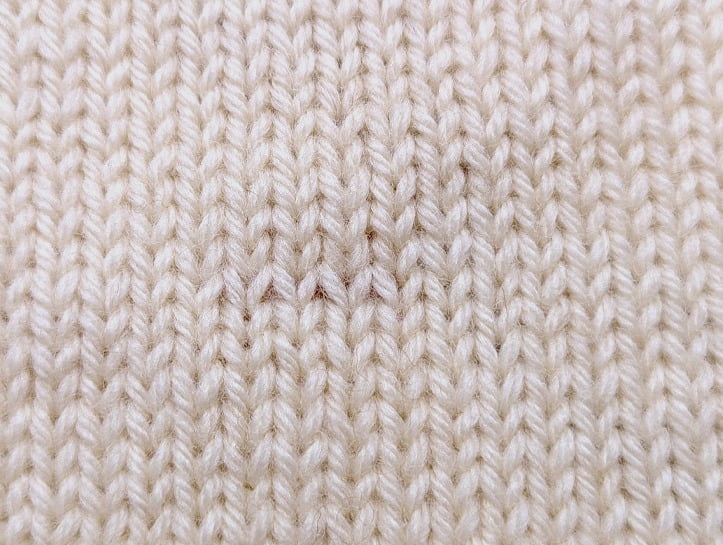
Right Side
I’ve used a contrasting coloured yarn so you could see more clearly exactly what I’ve done here. Once you’ve worked steps 1 through 3, all that’s left to do is snip those ends nice and short, and you’re done! Easy peasy. As you can see in the image above, when all is said and done, the yarn end is pretty well invisible when viewed from the right side of the fabric.
WEAVING IN ENDS USING DUPLICATE STITCH
Now, if you’re working seamlessly, at some point you’ve likely joined a new ball of yarn somewhere in the middle of your project. Which means those ends have nowhere to go unless we use some kind of strategy that allows us to neatly tuck them away within our work. So, how exactly do we do this? Well, I’m glad you asked!
One very popular way to weave in ends is the Duplicate Stitch Method. The basic principle behind duplicate stitch is to simply follow the path of the yarn strand along the row where your end happens to be located. You’ll thread that end through a tapestry needle, and simply weave it through your fabric in exactly the same manner (taking care to maintain the same tension) as all the other stitches in that row, creating several ‘doubled up’ – or duplicate – stitches.
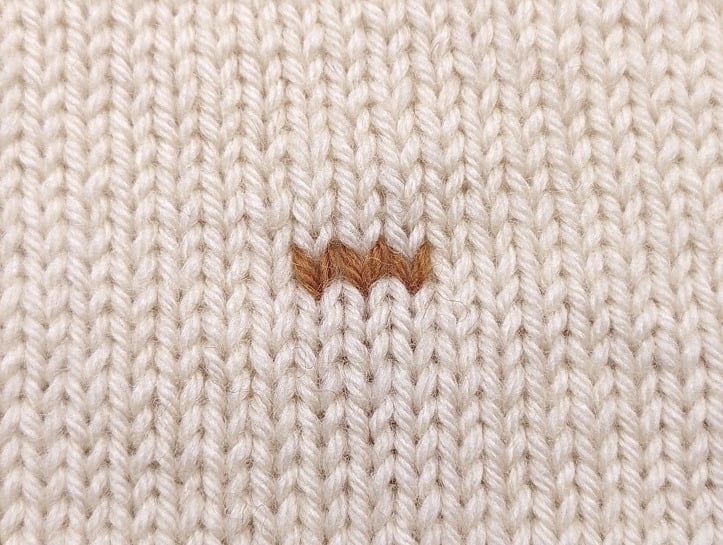
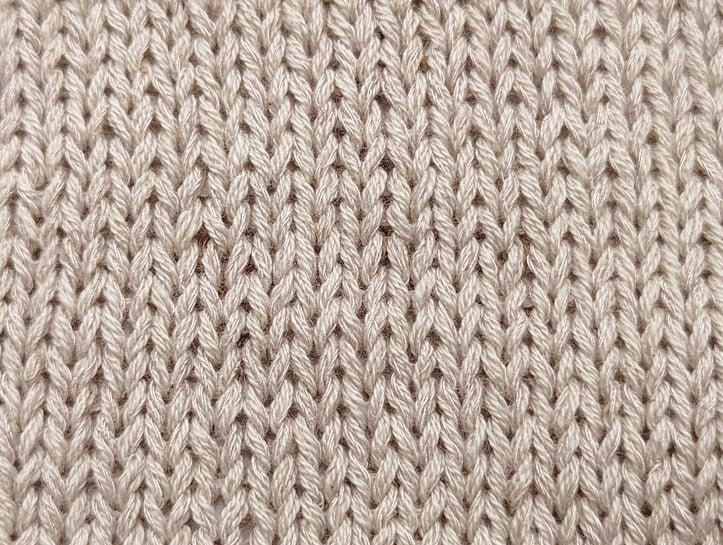
Let’s use stockinette stitch as our example, since it is undoubtedly the most widely used stitch pattern, and also happens to be the easiest to weave ends into. Take a look at the steps below:
stockinette stitch (on the right side)
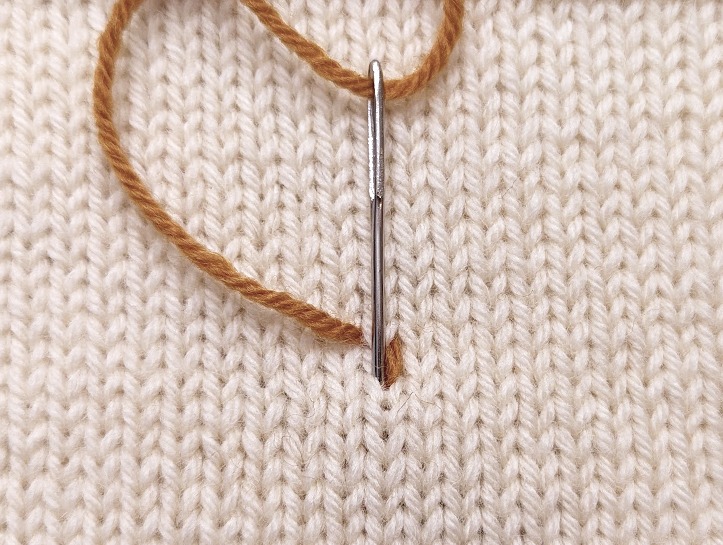
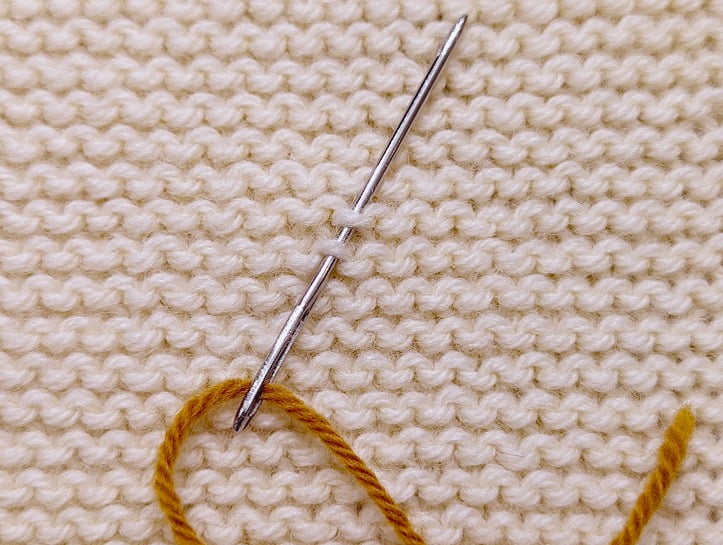
Step #1:
Insert your tapestry needle behind the ‘V’ located in the row directly above the stitch of your yarn end. Pull the end through.
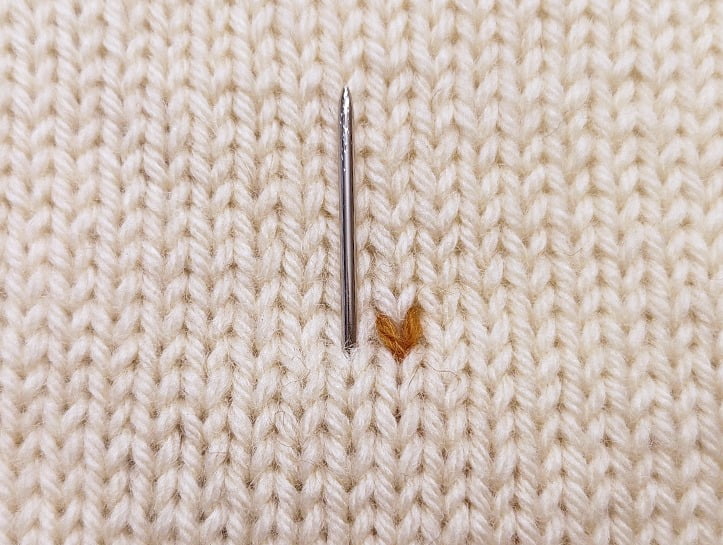
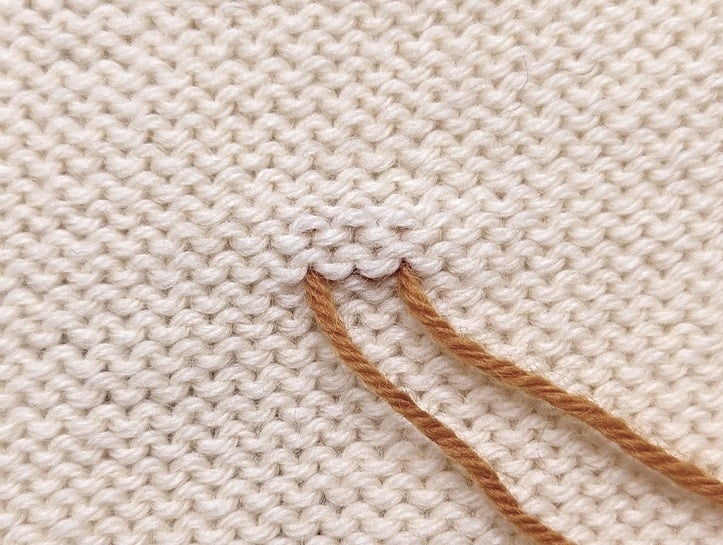
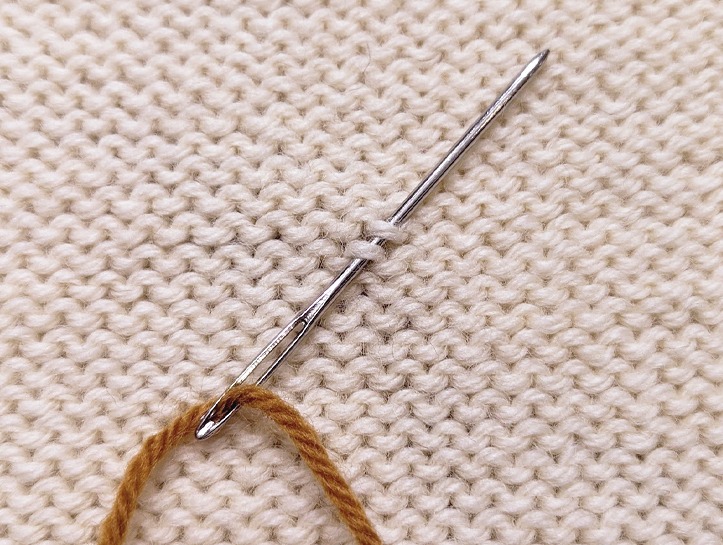
Step #2:
Insert your tapestry needle back into the same spot where you started. Pull the end through to the wrong side of your fabric.
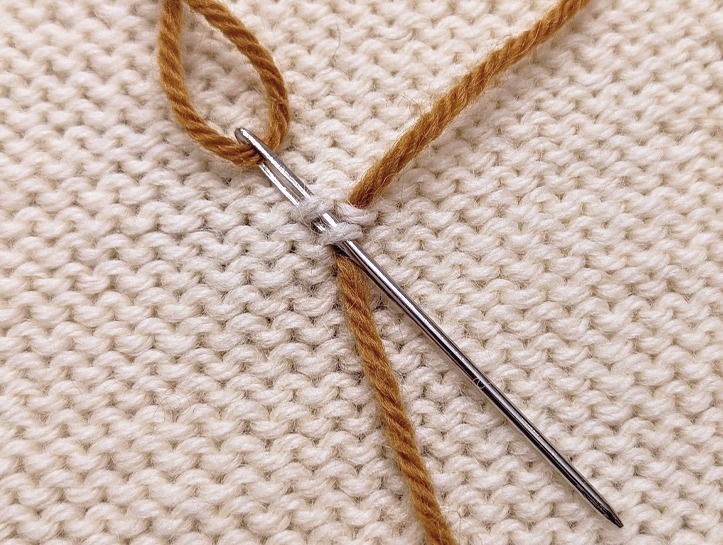
Step #3:
Insert your tapestry needle into the base of the next ‘V’, from back to front. Pull the end through.
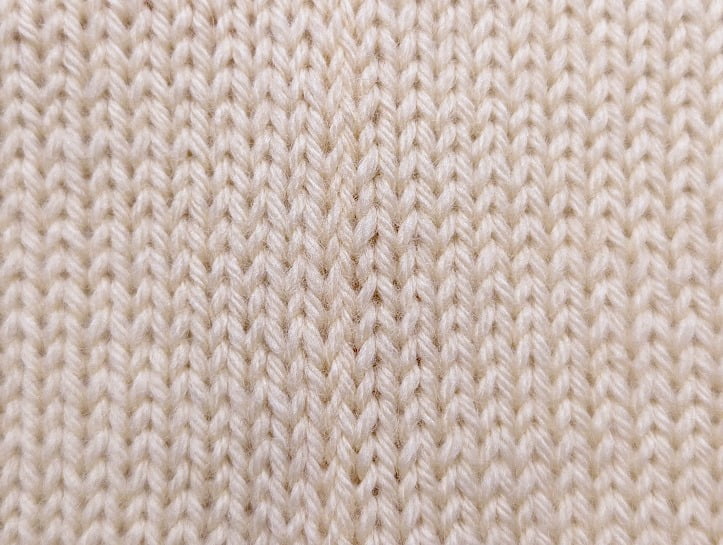
When you repeat Steps 1-3 above, you’ll get a series of ‘V’s’ that sit directly beside one another – as you can see in the image below. A perfect match to the knit stitch! On the wrong side of the fabric, you can see that the strand is pretty well invisible where it’s been woven in. Once again, all that’s left to do at this point is to snip those ends fairly close to where you’ve finished.
Right Side
Wrong Side
stockinette stitch (on the wrong side)
When weaving in ends on the wrong side of Stockinette, we’re still following the same principle. Although it can look a bit intimidating here, weaving in ends in Reverse Stockinette is actually quite simple. All you really need to remember is this – frowns to smiles, smiles to frowns.
If you look closely at all those little purl bumps, you’ll likely notice that they very much resemble tiny little macaroni’s – one that curves up (the smile), and one that curves down (the frown). The basic idea is this – you’ll always be inserting your tapestry needle into a ‘frown’, then into a ‘smile, or vice versa. Always on a diagonal. Let’s take a closer look at how it’s done:
Step #1:
Insert your tapestry needle up into a ‘frown’ (a stitch that curves down), then into a ‘smile’ (a stitch that curves up) on the diagonal. Pull the end through.
Step #2:
Insert your tapestry needle down into the next smile, then back into the originating frown. Pull the end through.
Step #3:
Insert your tapestry needle up into the next frown, then back into the originating smile. Pull the end through.
Wrong Side
Right Side
As you can see in the image above, although you can clearly see the woven in ends on the wrong side, the right side remains virtually unscathed. If I was to work in the same coloured yarn as my swatch using the exact same steps above, you surely wouldn’t be able to see it at all from the right side.
The Duplicate Stitch Method works wonderfully, particularly with Stockinette fabric, and is always my go to when working this particular stitch pattern. Because Stockinette is really just knit stitches on top of knit stitches next to knit stitches, you can effectively use Duplicate Stitch without it making much of a noticeable difference.
You can use this same basic principle – following the path of the yarn strand – for quite literally anystitch pattern with relative ease. However, it does tend to bulk up that particular area of your fabric – both on the right and wrong sides, which is why I would typically opt to use the Duplicate Stitch Method only when working in Stockinette or when working up a reversible project (and I’ve actually got ends to weave in). It’s simply the neatest solution I’ve come across – as far as weaving in ends is concerned.
That said, however, if I know that both sides of my knitting project is going to be visible, I would plan to ideally have no ends to weave in at all (apart from the cast-on and bind-off ends, of course). To do this takes some planning, and it typically means that I’d have joined my yarn throughout my project using either the Spit Splice Join, or the Russian Join.
weaving ends into knit & purl fabrics
For clarity’s sake, let’s take a quick look at how a woven in end would appear using a ‘true’ Duplicate Stitch on fabrics that alternate between knit and purl stitches. With most stitch patterns, you’ll notice that if you weave in your ends using Duplicate Stitch, those stitches end up rather bulky even on the right side of your work. And this can end up becoming quite noticeable in appearance, especially when working with heavier weight yarns.
Garter Stitch - Wrong Side
Garter Stitch - Right Side
Seed Stitch - Wrong Side
Seed Stitch - Right Side
As you can see, the contrasting coloured yarn still made its way through to the right side. You could tighten up those stitches to attempt to hide them better, but that would likely just mess with the tension of your fabric. And yes, of course, it would look less noticeable with the same coloured yarn, sure. However those duplicate stitches still add some unnecessary bulk to the right side of the fabric. So if you’re like me, and you’d rather the right side be as flawless as possible, we’ll need a slightly different strategy here.
When I know only one side of my project is ever going to be seen, I always opt to use an alternate version of the Duplicate Stitch Method – one that keeps all my ends neatly tucked away on the wrong side of my work without ever creeping up on the right side.
And although you can’t technically call this alternate method ‘Duplicate Stitch’, I still find myself following the same general principle – to follow the path of the yarn strand. Only here, I’m taking liberties and making adjustments to ensure that my ends remain visible only on the wrong side of my fabric.
So without further ado, let’s take a closer look at how it’s done on some of the most widely known knit and purl fabrics.
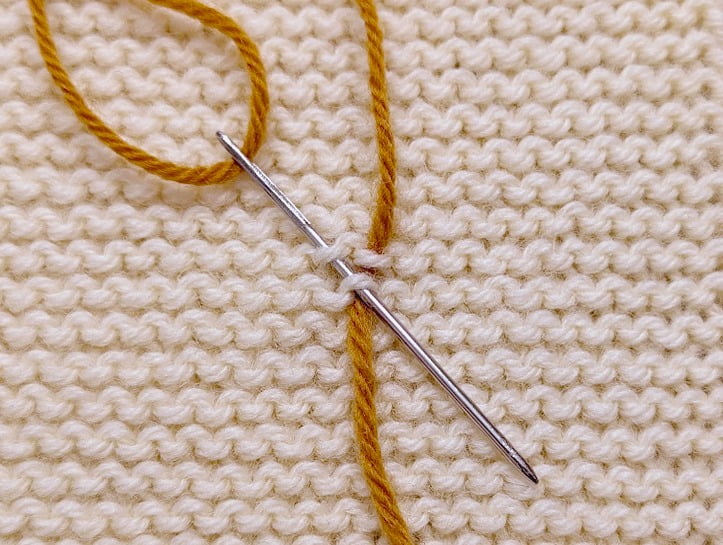
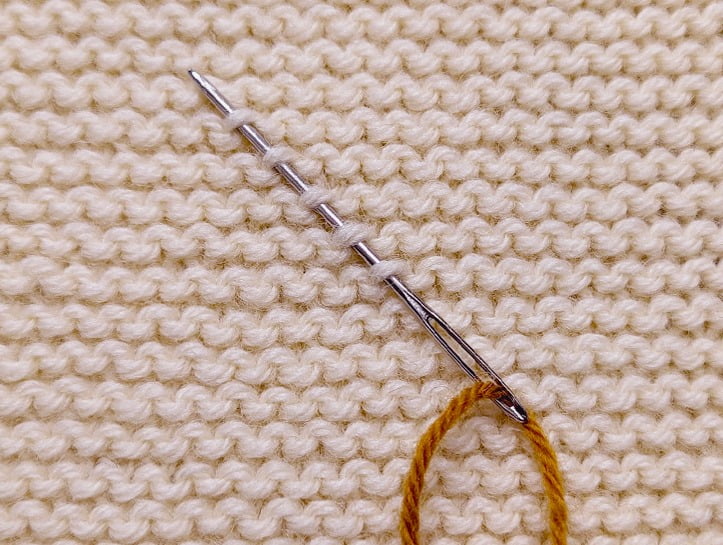
garter stitch
First up – Garter Stitch. This one is actually quite simple – for fabrics worked in Garter Stitch, you’re essentially making the same movements as you would when weaving in ends on the back of Stockinette, only you’ll be ignoring all the ‘knit’ rows in between all those lovely purl bumps. Just as it is with Reverse Stockinette, all you need to remember is ‘frowns to smiles, smiles to frowns’. Let’s see what this looks like:
Step #1:
Insert your tapestry needle up into a ‘frown’ (a stitch that curves down), then into a ‘smile’ (a stitch that curves up) on the diagonal. Pull the end through.
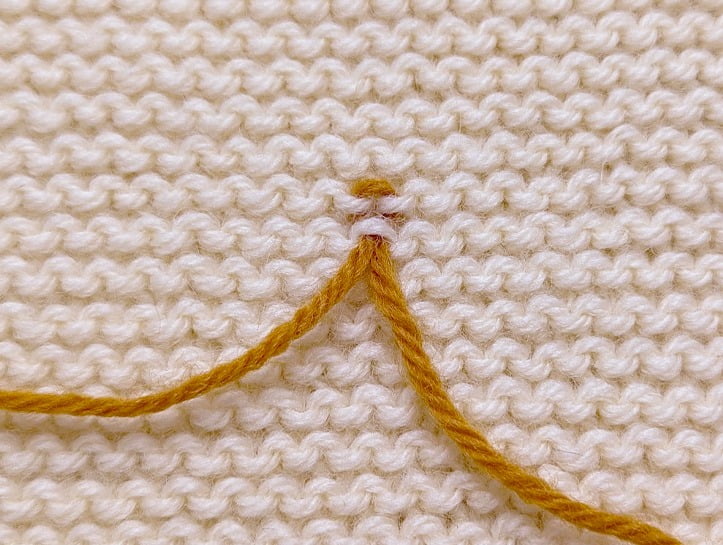
Step #2:
Insert your tapestry needle down into the next smile, then back into the originating frown. Pull the end through.
Step #3:
Insert your tapestry needle up into the next frown, then back into the originating smile. Pull the end through.
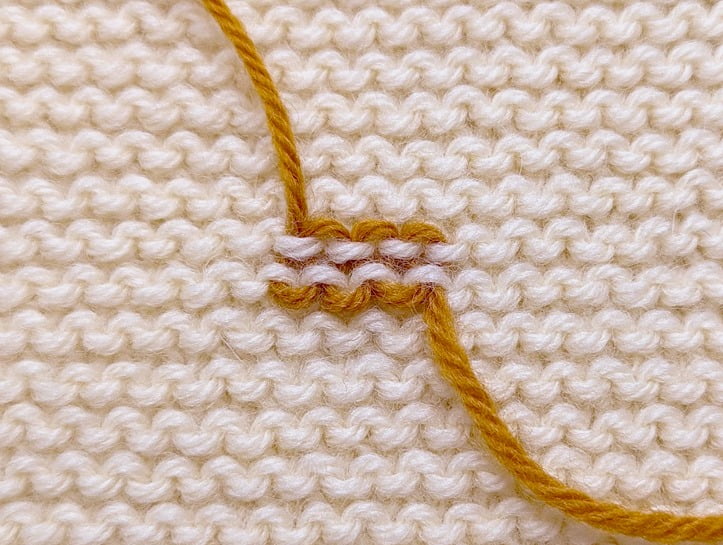
Wrong Side
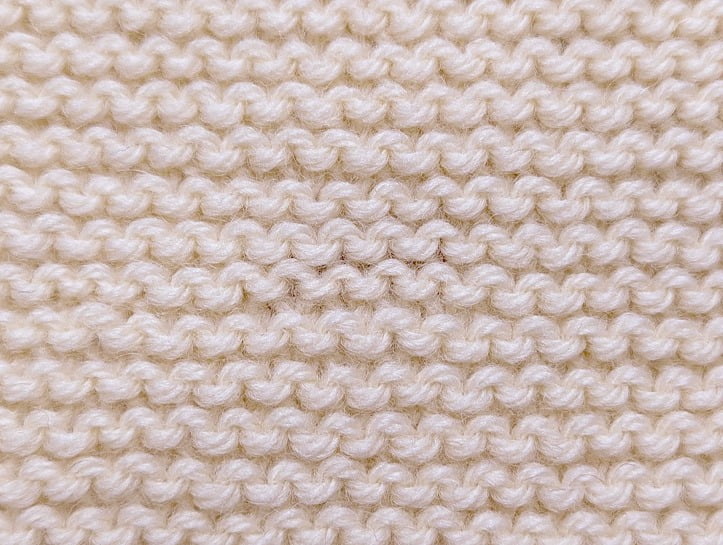
Right Side
As you can see in the images above, the end result is a flawless right side with no noticeable ends showing through.
seed stitch
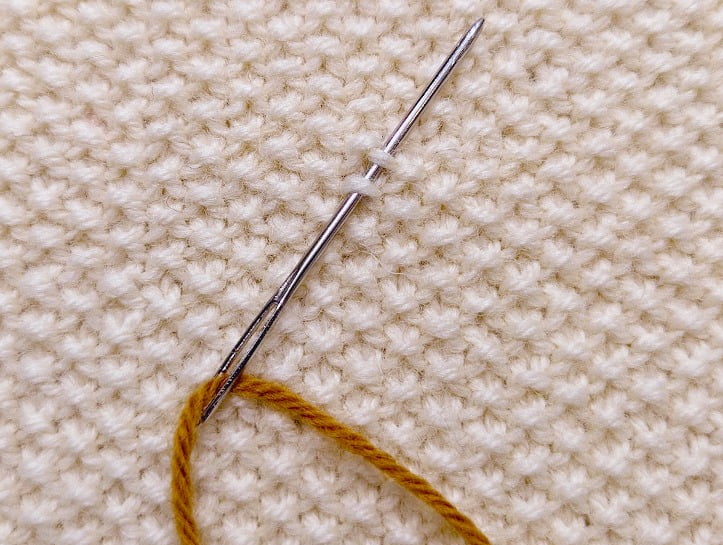
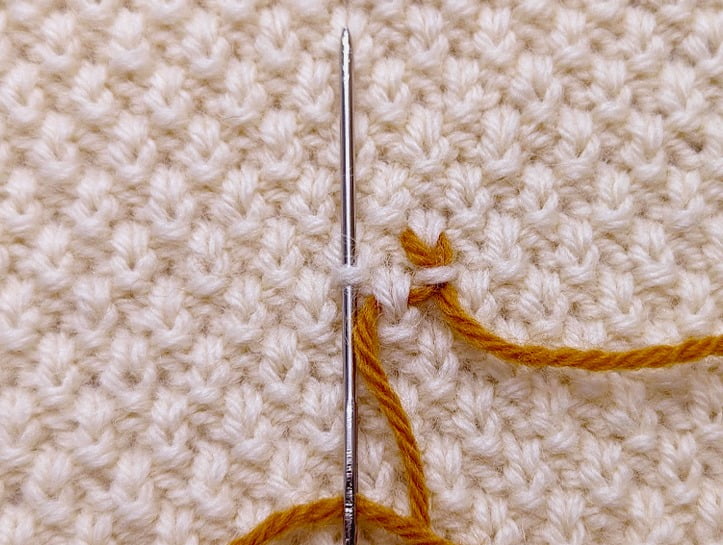
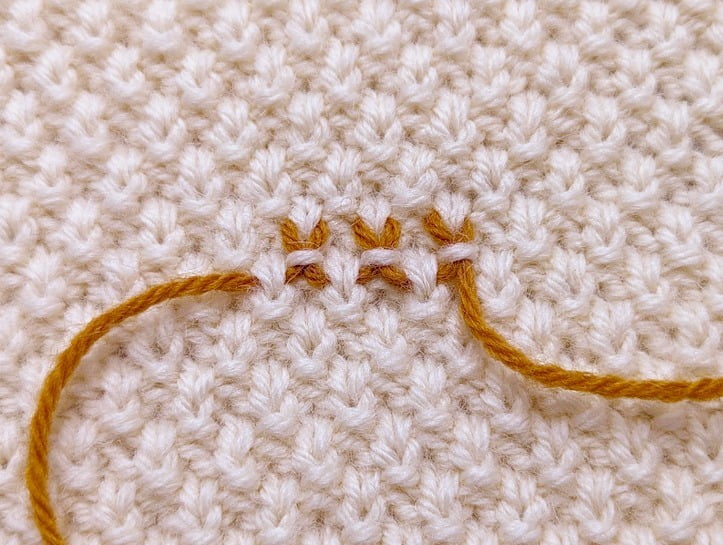
Seed Stitch is a little more tricky, although essentially I’m still using the same principle as for Garter and Stockinette. Only this time, I’m looking for frowns and halfsmiles. If you look at the steps below, you’ll see that I’ve inserted my tapestry needle up into a frown, then into the adjacent half smile (Step 1), down into the next half smile, and back down into the same frown that I started in (Step 2).
When you go into the next frown to repeat these two steps, you’ll notice that it will be located either one stitch higher (or one stitch lower) than the previous frown. The end result looks quite similar to that of Garter and Reverse Stockinette – only on a diagonal.
Step #1:
Insert your tapestry needle up into a ‘frown’ (a stitch that curves down), then into the adjacent ‘half smile’ (a stitch that curves up) on the diagonal. Pull the end through.
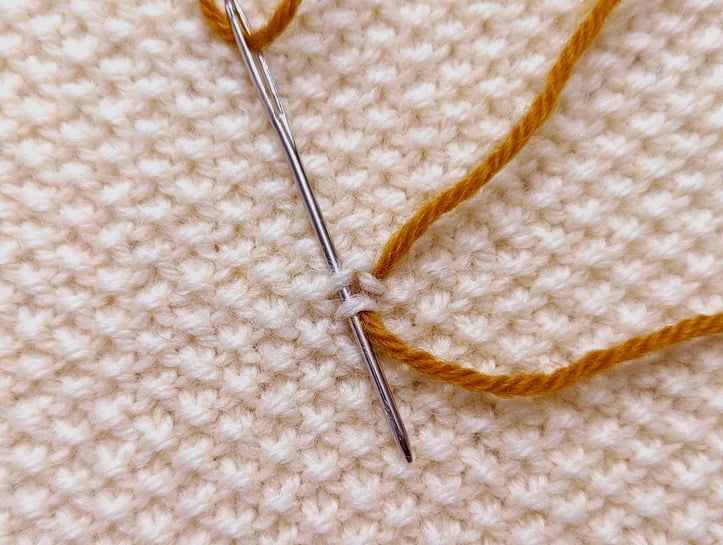
Step #2:
Insert your tapestry needle down into the next half smile, then back into the originating frown. Pull the end through.
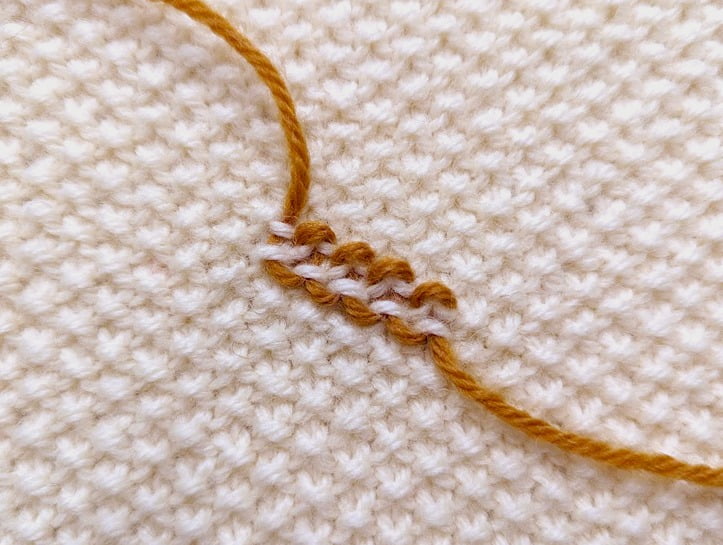
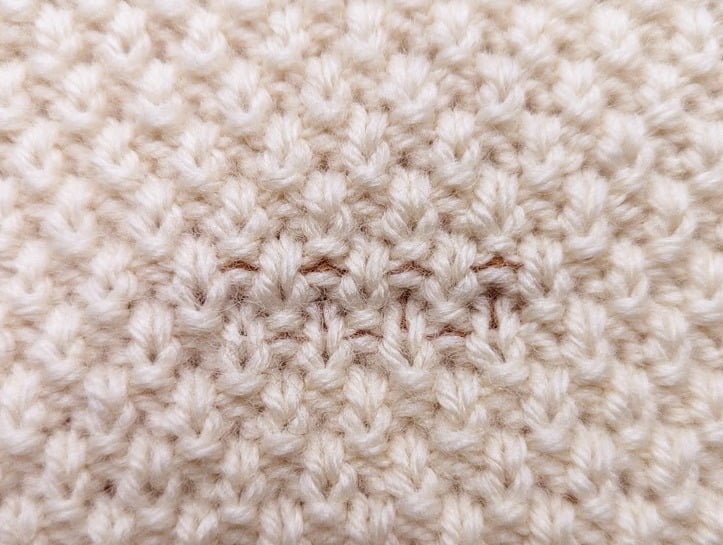
Seed Stitch - Wrong Side
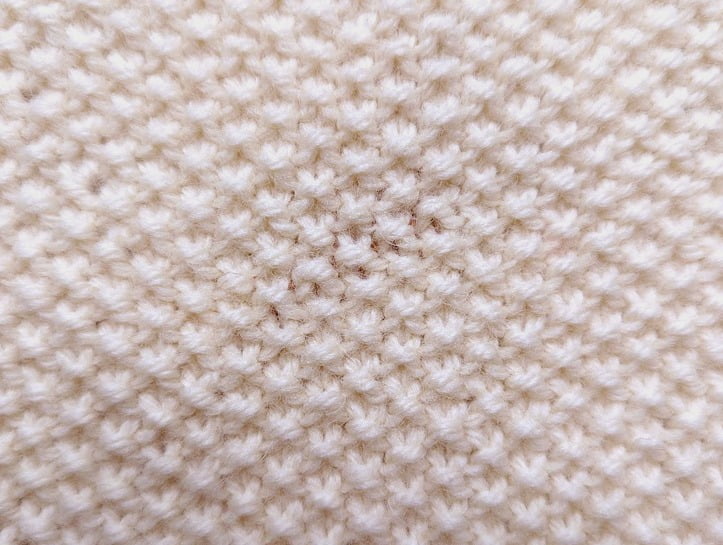
Seed Stitch - Right Side
double seed stitch
I use a slightly different method when weaving my ends into Double Seed Stitch fabric. Here, you may notice that it looks quite similar to how we’ve woven in our ends on the right side of Stockinette. The difference here, is that you’ll begin by inserting your needle into the purl stitch located directly under the two knit stitches. You’ll then insert your needle behind the top knit stitch, then back down into the originating purl stitch. Rinse and repeat.
The result is a more ‘wide spread’ version of the result we get for the right side of Stockinette.
Step #1:
Insert your tapestry needle into the purl bump located below 2 stacked knit stitches. Pull the end through.
Step #2:
Insert your tapestry needle behind the knit stitch 2 stitches above the purl bump. Pull the end through.
Step #3:
Insert your tapestry needle back into the originating purl bump. Pull the end through.
Step #4:
Insert your tapestry needle behind the knit stitch located directly below and to the side of the purl bump you just inserted your needle into. Pull the end through.
Step #5:
Insert your tapestry needle into the next purl bump, repeating Steps 1-4 as desired.
Wrong Side
Right Side
Although you can still see a tiny bit of the contrasting coloured yarn here on the right side of the fabric, for me it really isn’t noticeable enough to be bothered by. And as you can imagine, working in the same coloured yarn would make it pretty much invisible!
WEAVING IN ENDS VERTICALLY
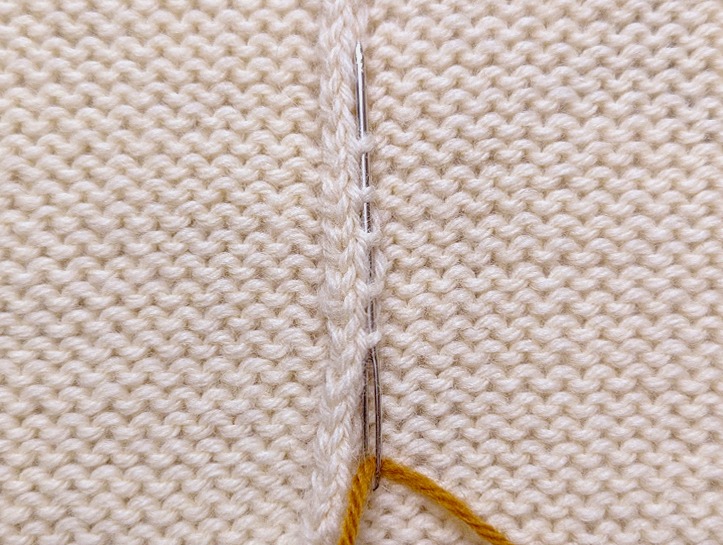
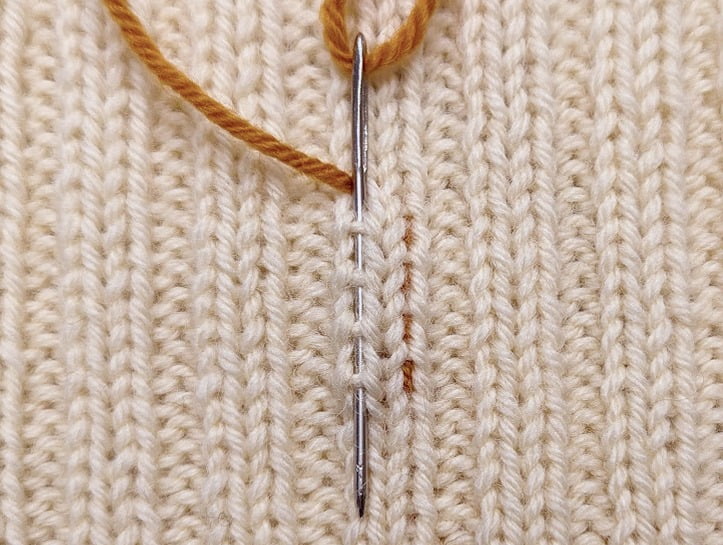
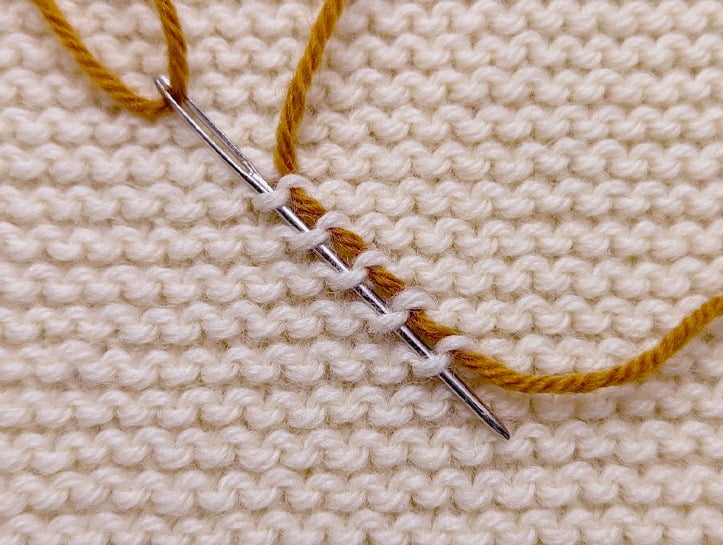
When it comes to ribbing, weaving in ends along a vertical column is your best bet. Because much of the time we want our ribbing to remain stretchy, weaving in ends on the horizontal for this type of stitch pattern runs the risk of compromising that stretch. There are two ways you can weave in your ends on the vertical – either inside the two ‘legs’ of a single knit column, or through the horizontal bars found between the two ‘legs’.
inside the legs of a column of knits
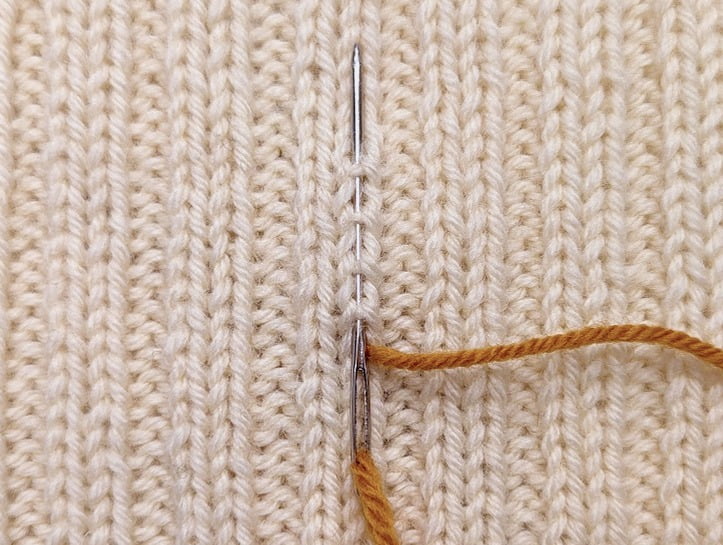
Step #1:
Insert your tapestry needle behind several right legs of a column of knit stitches. Pull the end through.
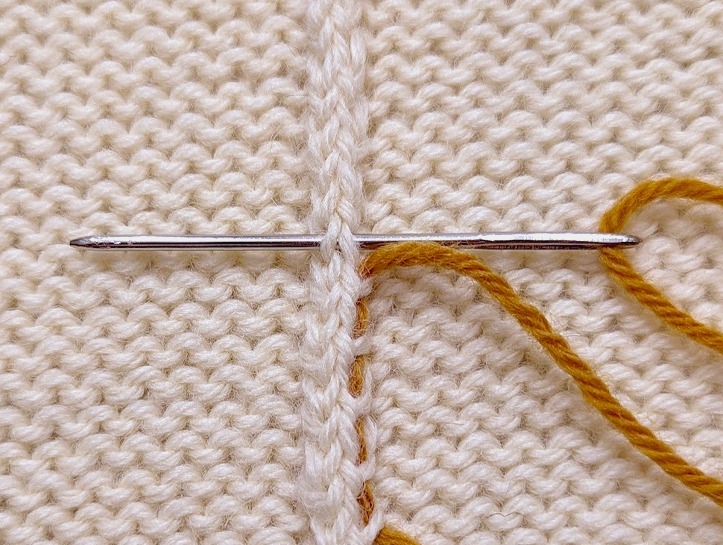
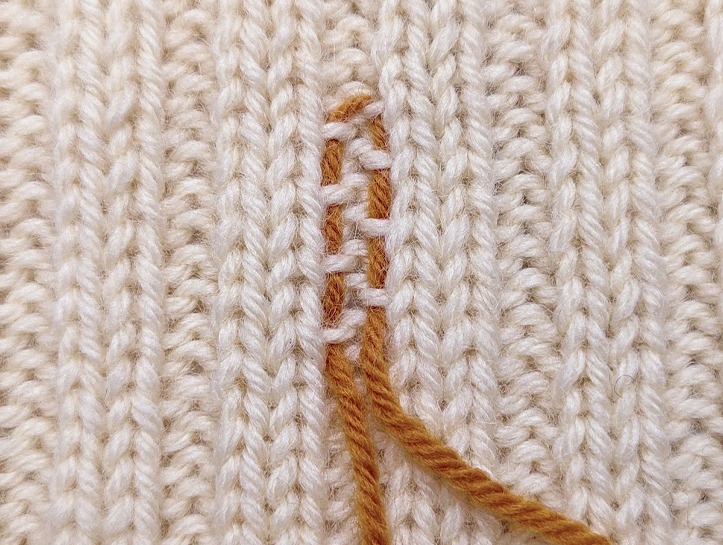
Step #2:
Insert your tapestry needle behind the ‘V’ directly above the last right leg. Pull the end through.
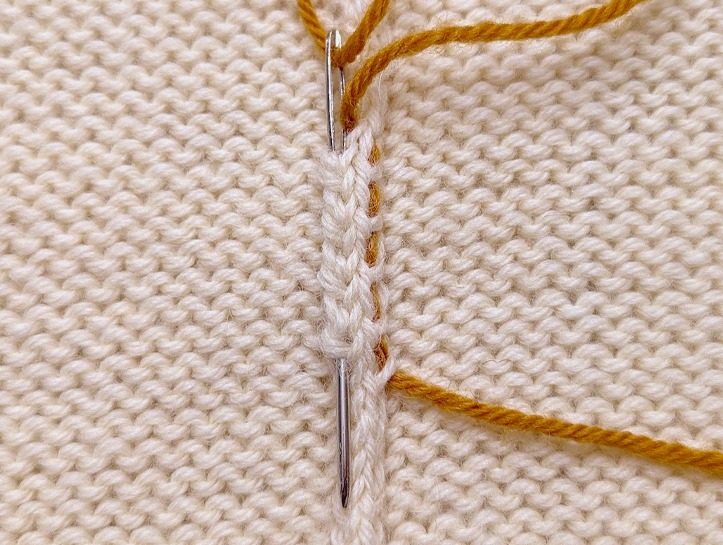
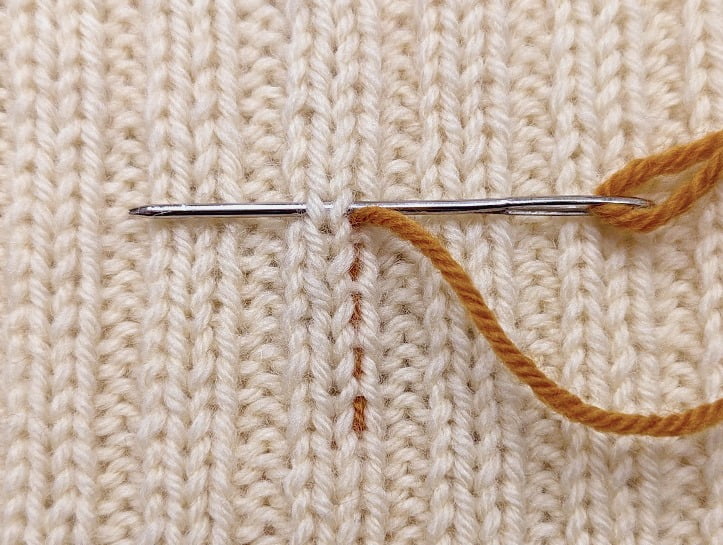
Step #3:
Insert your tapestry needle down into the left legs of the same column of knit stitches. Pull the end through.
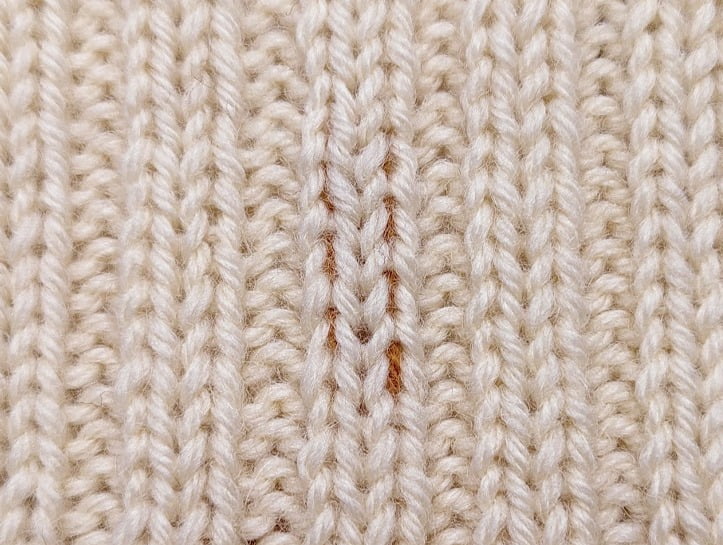
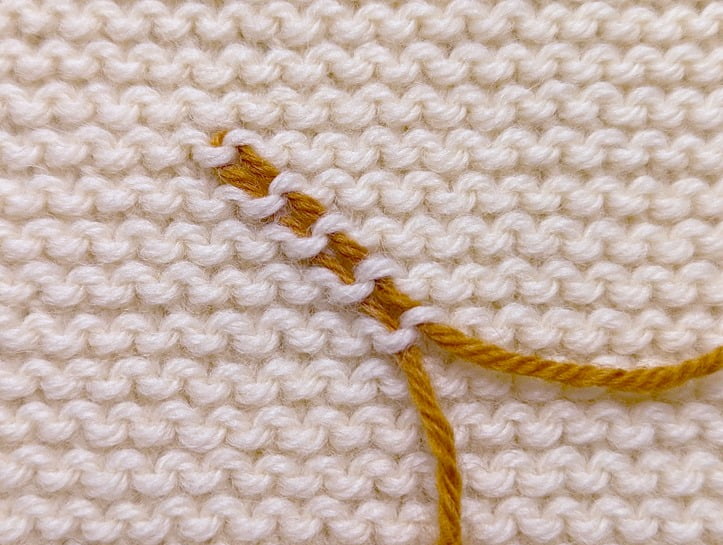
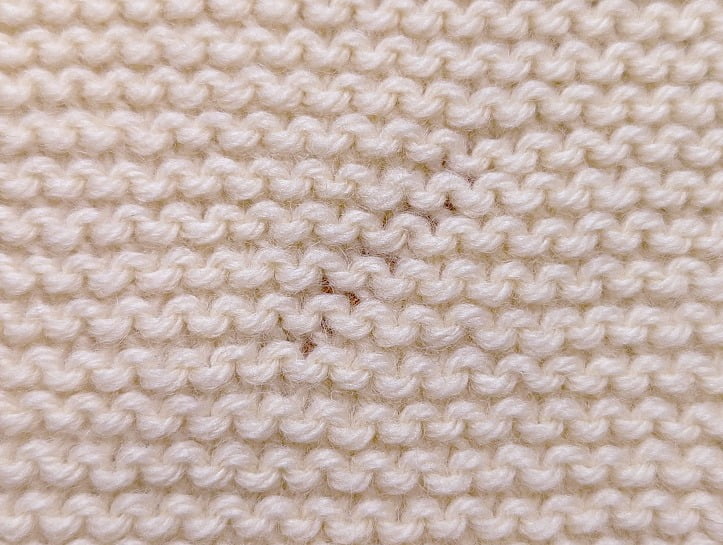
Wrong Side
Right Side
between the two 'legs'
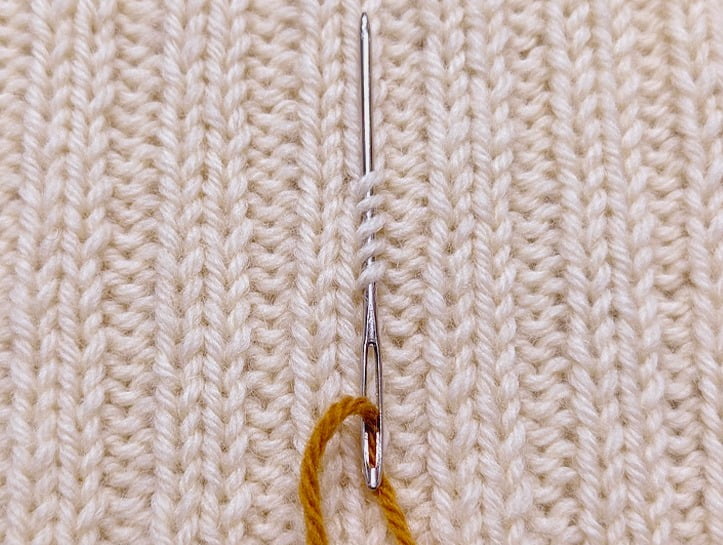
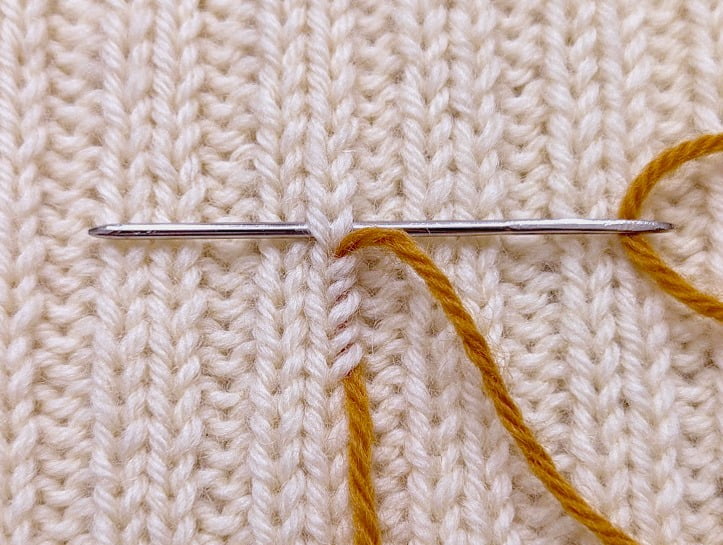
Step #1:
Insert your tapestry needle behind the horizontal bars found between the left and right legs of a knit column of stitches. Pull the end through.
Step #2:
Insert your tapestry needle behind the ‘V’ located immediately above the last bar. Pull the end through.
Step #3:
Insert your tapestry needle down into the horizontal bars between the left and right legs of the next column of stitches. Pull the end through.
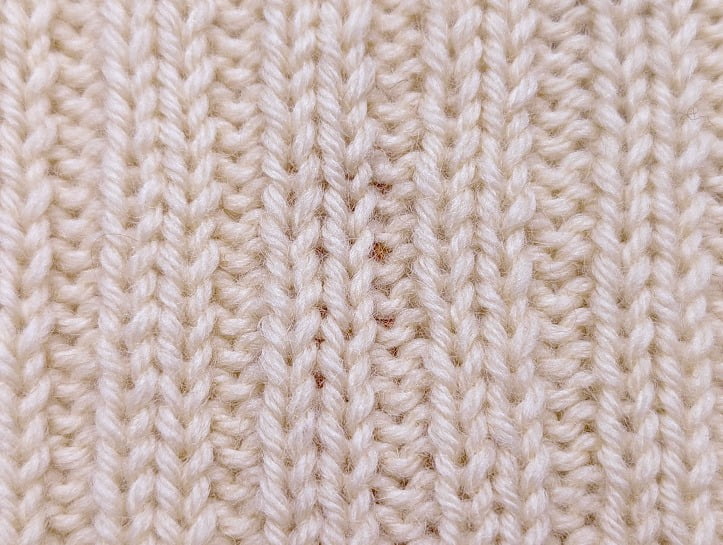
Wrong Side
Right Side
WEAVING IN ENDS DIAGONALLY
Another effective and secure way to weave in your ends is by weaving them in on the diagonal. Although this method will end up being very much visible on the wrong side of your fabric, it can be a great option for when you want to weave in your ends quickly.
You can use this method quite effectively on fabrics such as stockinette, garter, and seed/double seed stitch.
Step #1:
Insert your tapestry needle into several ‘frowns’ located diagonally from one another. Pull the end through.
Step #2:
In the opposite direction, insert your tapestry needle into the ‘smiles’ located next to the frowns your inserted your needle into. Pull the end through.
Wrong Side
Right Side
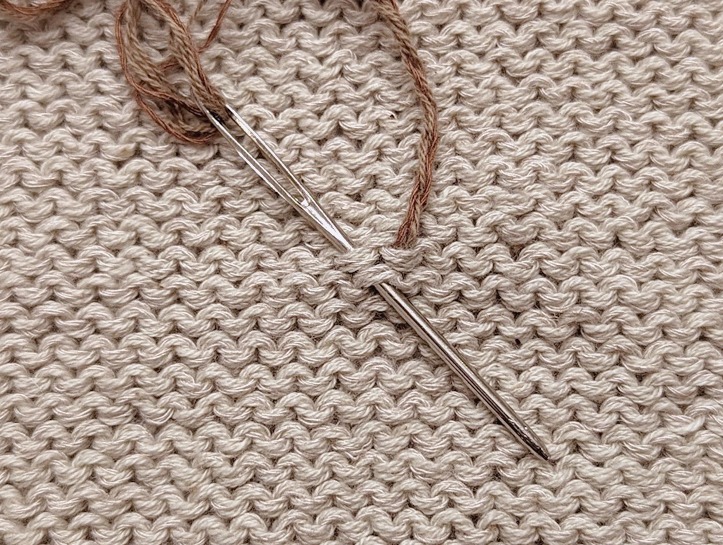
WEAVING IN THE ENDS OF SLIPPERY FIBERS
When it comes to plant fibers (such as cotton, linen, bamboo, etc.), you’ll need a different strategy for weaving in your ends. Because these fibers tend to be rather slippery, using the above methods may result in ends that come undone over time.
Thankfully, there’s a really simple solution to this – that is, split your plies. That’s it! Below, I’ve demonstrated how to weave in slippery ends on the wrong side of Stockinette, using a yarn made up of cotton, linen, and viscose (all plant fibers). The main thing to note here is you’re working each section of plies in the oppositedirection to one another. It’s this weaving in opposite directions that helps to keep that slippery end in place.
Let’s take a closer look at how it’s done, shall we?
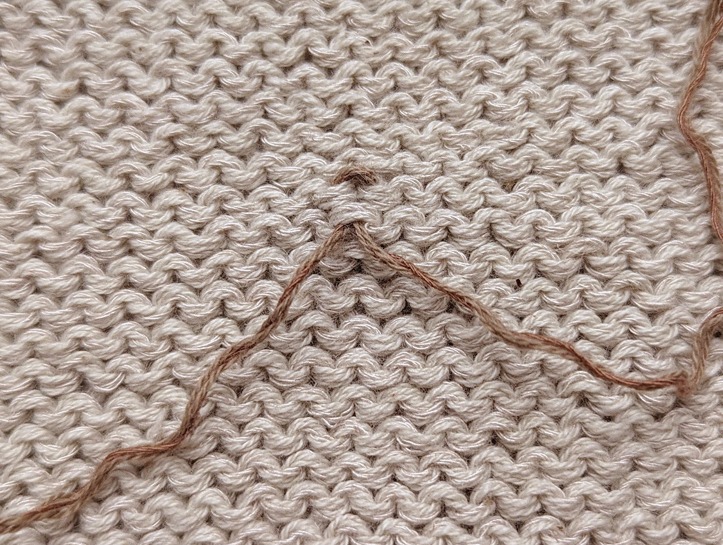
Step #1:
Begin by weaving in your end through a single stitch using any of the methods described above.
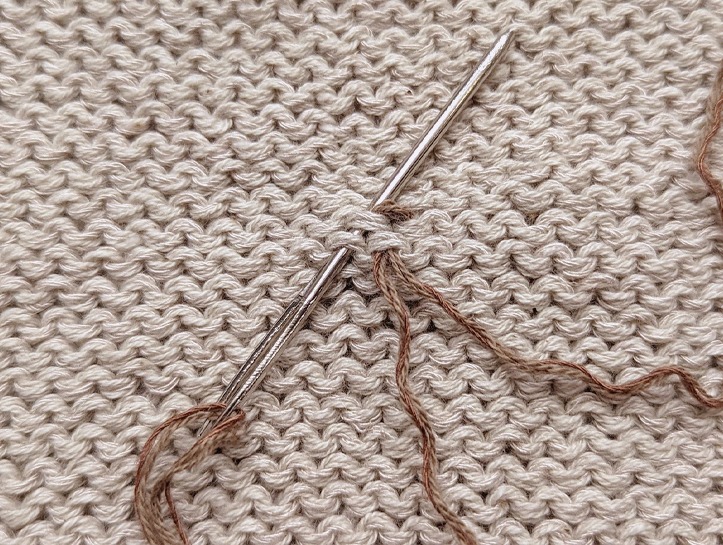
Step #2:
Split the plies of your end into two separate sections.
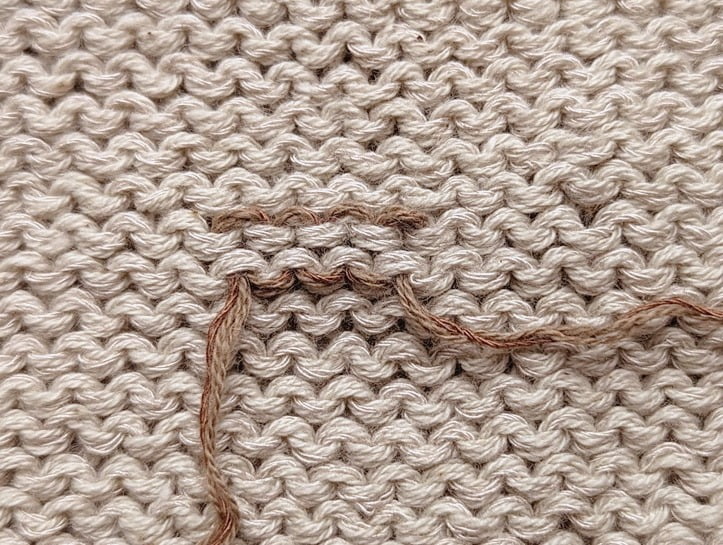
Step #3a:
Thread one section of plies onto a tapestry needle, and begin weaving in your end using any of the methods described above.
Step #3b:
The resulting woven in section of plies.
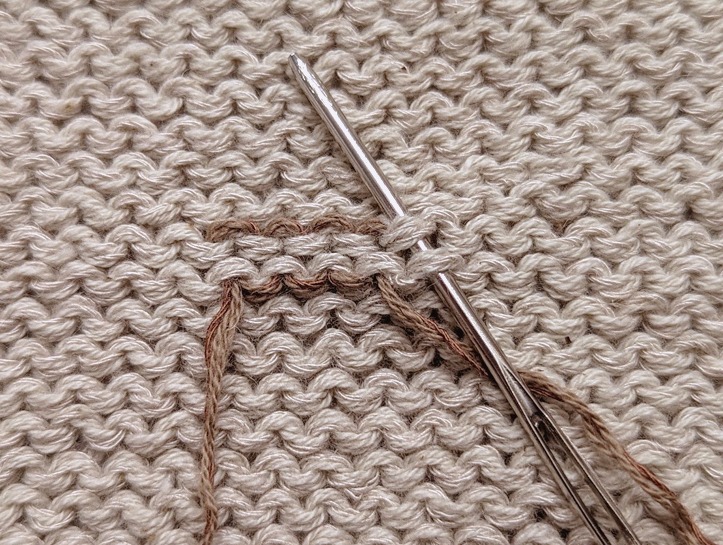
Step #4:
Thread the other section of plies onto a tapestry needle and begin weaving it in in the opposite direction.
Wrong Side
Right Side
some final words...
And there you have it! Just some of the many ways in which you can weave in those pesky ends. I hope you’ve found this post useful, and as always – if you have any questions, leave them in the comments section below and I’ll be happy to help you out!