Affiliate Disclaimer: This post may contain affiliate links. This means that I may earn a commission if you make a purchase through these links. I only recommend products and services that I personally use and believe will add value to my readers. Your support helps keep this blog running and is greatly appreciated. Thank you!
Understanding how to achieve accurate gauge is easily the most important task we knitters must get a handle on if our desire is to end up with a garment that actually fits (and let’s be real here, who doesn’t want to end up with a garment that fits?).
Sure, you can get away with ignoring gauge when the size of the piece you’re working on doesn’t really matter all that much (like a simple scarf or cowl, for instance). But when you’re knitting something size-dependent – like a sweater – getting your mind wrapped around gauge is an absolute, non-negotiable must.
So, exactly what is gauge, anyway? To put it simply – gauge is a measurement used to determine the size of a knitting project once it’s been completed. Typically, gauge is determined by counting how many stitches and rows make up a 4 inch square within a knitted fabric.
Gauge is strongly influenced by four main factors: needle size and material, yarn weight and fiber content, the overall stitch pattern, and your knitting style.
You can control factors 1 to 3 fairly easily – just grab the same needles and suggested yarn listed in your chosen pattern, and you’re good to go! Easy peasy. It’s that chancy #4 that makes this whole gauge thing tricky.
Why is that, you ask? Well, chances are, you and I are probably going to knit quite differently from one another. We all have varying grip strengths – some of us are naturally more tense (or more relaxed) in the way we wrap our yarn around our needles than others. Some of us prefer to knit continental, while some of us prefer to throw.
Naturally, we all fall somewhere on a scale between very loose to very tight knitting styles. Depending on where we fall on this scale, we can (and probably will) end up with a wildly different gauge than that of the next knitter, regardless of whether or not we are using the exact same needle with the exact same yarn.
As you can probably guess, all of this can make achieving the correct gauge for any given pattern rather tricky – which I’m sure is part of the reason why so many of us tend to skip this step altogether! But, don’t be intimidated! With just a tiny bit of knowledge, practice and strategy, achieving accurate gauge really doesn’t have to be such a drag.
Before we get into exactly how to knit and measure a gauge swatch accurately, let’s dive a little deeper here and really get into how each of these four factors have the potential to affect gauge! Here we go!
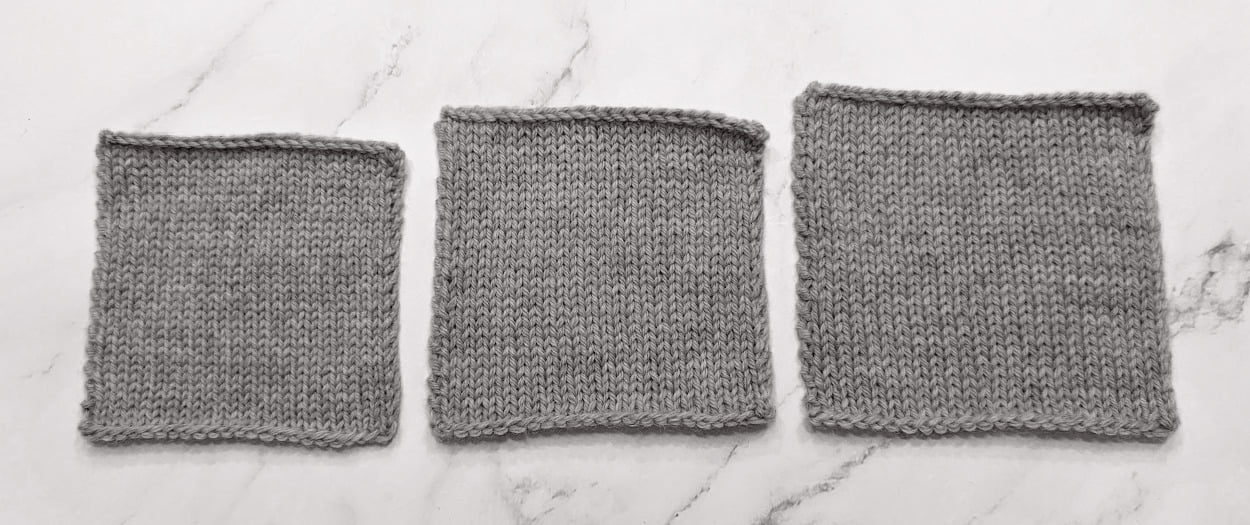
As you can see in the photo below, each swatch from left to right gets slightly larger than its neighboring swatch. Would you be surprised to hear that all three of these swatches are knit with the exact same number of stitches and rows, with the exact same yarn, and by the exact same person?
Controlling all (or most) other variables, this is a great illustration of how going up or down a needle size can offer you a solution to achieving accurate gauge. That is – if you’re finding your stitches are too large when measured against your pattern’s gauge, simply go down a needle size and see where that gets you. Likewise, if your stitches are too small, simply go up a size.
There is more to a knitting needle than its size, though – and although size is certainly going to be the dominant and most obvious factor affecting gauge here (as far as needles are concerned) – other attributes such as material (wood vs. metal vs. plastic), needle type (circular vs. straight), and even the brand you use can bear the slightest difference from the needles used by the designer of your chosen pattern.
Have you ever inserted two separate needles of the same advertised size into the same needle gauge slot, only to find that one fits in a little more snug than the other? I know I have. And although these seemingly marginal differences are ever so slight, you’ll be surprised at how much potential they actually have to throw off your gauge.
And depending on the way that you knit, even the material of your needles can yield slight differences in gauge. That is, some of us may notice that needles made of metal can offer a slightly looser gauge than the same sized needle made of wood.
So with all these discrepancies to consider, what’s a knitter to do, then? The best advice I’ve come across here is to always knit your gauge swatch in the exact same manner and with the exact same needles you intend to use for the majority of your finished project. For example, if most of your project is worked in the round on circular needles, swatch for in the round knitting – on the same circular needles you intend to use for the majority of said project.
You will, of course, still need to do some experimenting with needle sizes in order to determine which one gets you the correct gauge – but by using the same materials you intend on using for your project, at least you will have accounted for all (or most) of the other variables.
Yarn is probably the easiest factor to control among the four listed here. You can be fairly confident in knowing that a manufacturer’s yarn will be pretty much the same from hank to hank, skein to skein. Therefore, all you’ll really need to do here – that is, if you really want to control all variables – is to use the same yarn as your pattern suggests.
But of course, this isn’t always possible and not at all necessary. For various reasons, much of the time we knitters end up opting to go down the route of yarn substitution. Maybe you can’t find your pattern’s suggested yarn – or maybe it’s been discontinued. Or perhaps you just love the fabric that another yarn yields so much that you’d really rather use that yarn than the one suggested. Whatever your reason, yarn substitution is very likely going to creep up somewhere along your knitting journey. But of course, this usually means that you’re much more likely end up with some discrepancies in gauge.
So again, what’s a knitter to do? Well, you really just have to be a bit mindful and strategic about it all. You’ll be much more successful substituting your pattern’s suggested yarn with a yarn that is made up of similar qualities, for example (check out yarnsub.com if you’re looking to go that route!). If, however, you really want to use a yarn that’s totally different from your pattern’s suggested yarn, there are ways to manipulate gauge so that you can still make your pattern work with your chosen fabric (more on that below).
The stitch pattern used within a knitting project can drastically affect its final measurements. For example, the image below shows three separate swatches knitted with the exact same yarn and needles, over pretty well the same number of stitches and rows (+/- one stitch).
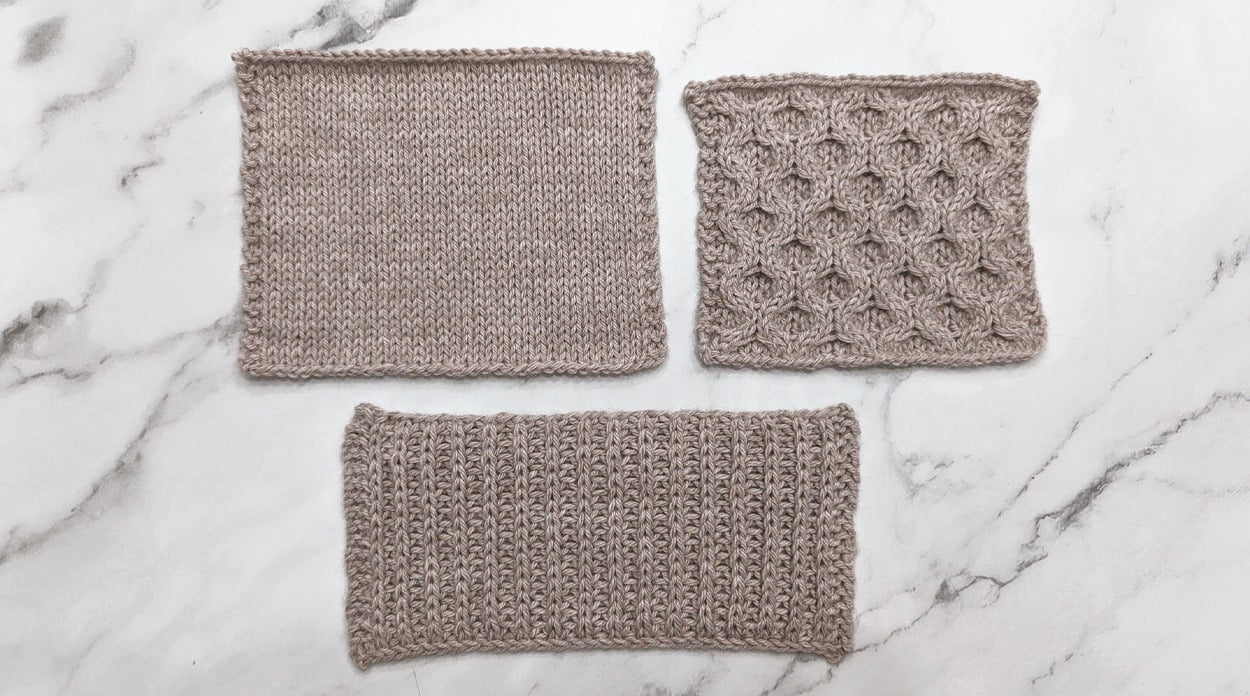
At the top left, I’ve got our basic ‘ol Stockinette swatch worked over 36 stitches and 34 rows, and on the top right – a Honeycomb Cable swatch worked over the exact same number of stitches and rows. Comparing these two swatches alone, you can see rather clearly that the Stockinette swatch is much larger both in length and in width. As you can probably guess, the nature of cable knitting has each cable pulling the surrounding stitches inward towards itself, resulting in a fabric that’s both shorter and narrower than our standard Stockinette.
And there at the bottom, I’ve got a swatch knit up in Half Fisherman’s Rib worked over 35 stitches and 34 rows. You can see that even with one stitch less than the other two swatches, it still turned out much wider than both. Lengthwise, however, we’ve got a different story – boy, did this one end up short! Why is that, you ask? Well, because Half Fisherman’s Rib takes two worked rows to complete one full row, it would need many more rows to make up the same length as the other two swatches.
We’ve now arrived at the most unpredictable factor affecting gauge – the way you knit. As briefly mentioned in the intro to this article, we knitters obviously all knit differently from one another (and why wouldn’t we?). Our knitting is just as individualistic as we are, and it really shouldn’t be any other way.
There’s no use in trying to change the way you knit so that you can match a pattern’s gauge – and honestly it’s quite silly to try, don’t you think? You’re very likely to run out of steam expending your energy on maintaining an unnatural knitting style. I’d imagine this would also really just suck the joy out of it all, so please don’t attempt this. You knit the way you knit because you are you and that’s perfectly fine!
Instead, try switching up your needle size as suggested above. It may end up taking a bit more time than you’d like, but I promise – your knitting will thank you for it!
So, how do you knit a gauge swatch, anyway? Now that we’ve covered the main factors that may affect the outcome of your gauge swatch, let’s get into how to actually do the thing.
Gauge is typically listed in a pattern as a 4×4 inch measurement – that is, how many stitches and rows fit within a 4 inch square. Keeping this in mind, you’ll want to make sure your gauge swatch has enough stitches and rows to comfortably span a 4 inch square. This means you’ll need to knit a swatch that is larger than 4 inches both in width and in length so that you have enough information to measure gauge accurately. Exactly how large you want to make your swatch is entirely up to you, of course. Just be sure to make it larger than 4 inches long and wide.
So, how does one know how many stitches to cast on in order to end up with a large enough square? Good question! It’s really quite simple, actually – just take a look at your pattern’s gauge and add a few more stitches to your cast on count. For example, if your pattern lists its gauge as 21 stitches and 28 rows in a 4×4 inch square, cast on a few more stitches than 21 (say, 30) and work up a few more rows than 28 (say, 40) to ensure that you end up with enough information to measure from.
Once you know how many stitches you need to cast on, it’s time to start knitting the thing! Sit back, relax, maybe put on some Netflix, and knit knit knit until you’ve reached your desired length.
One thing to note here, is that you’ll want to make sure you cast on and bind off loosely. A tight cast-on and bind-off can alter the width of your stitches, defeating the purpose of creating a gauge swatch to begin with. Therefore, be sure to choose a cast-on and bind-off that will allow you to maintain a good level of stretch.
If the garment you’re intending to knit is mostly worked in the round, you’ll need to knit a gauge swatch that will reflect this kind of knitting.
Getting back to basics for a sec here – the difference between knitting in-the-round and knitting flat is that you are always working on the right side when knitting in-the-round. This is precisely why a regular (flat) knit swatch won’t necessarily give you an accurate gauge measurement for circular knitting.
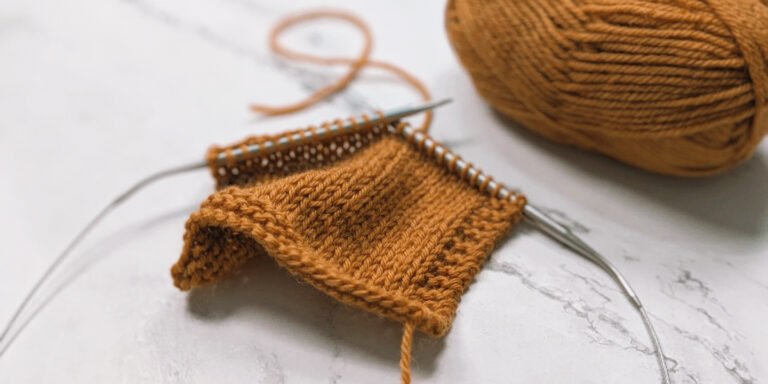
So, how does one knit a gauge swatch in the round? Well, you could cast on enough stitches to make up a diameter larger than 4 inches (and then join to work in the round), but honestly to do this you’ll need to use up quite a lot of yarn and it’ll take you at least twice as long as if you were to knit a regular, flat swatch. Personally, I’ve always dreaded the idea of knitting a cylindrical tube large enough to get an accurate gauge reading from for circular knitting – but thankfully, there is an alternative!
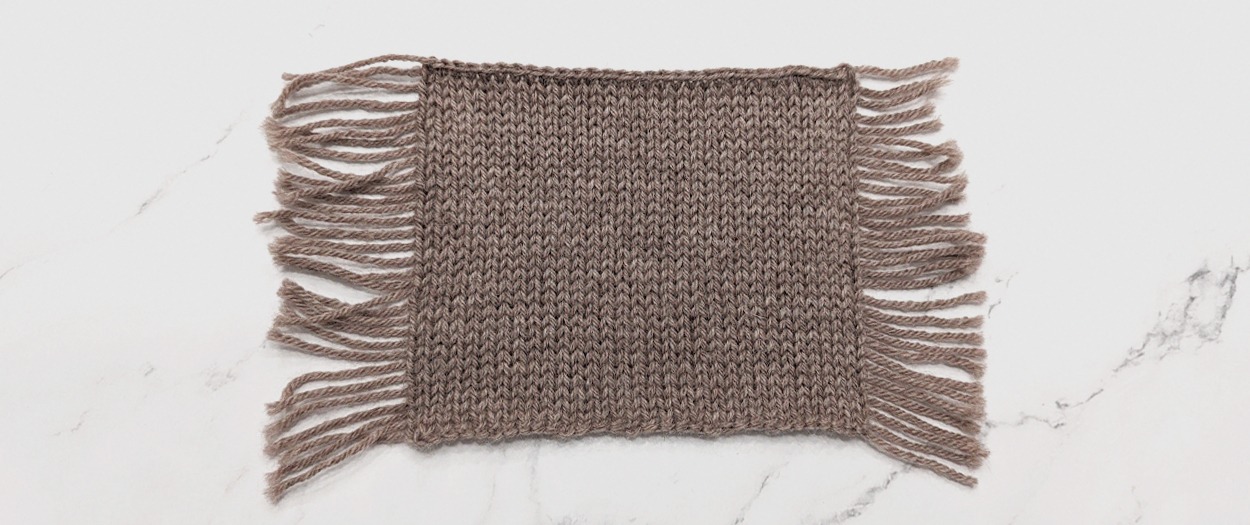
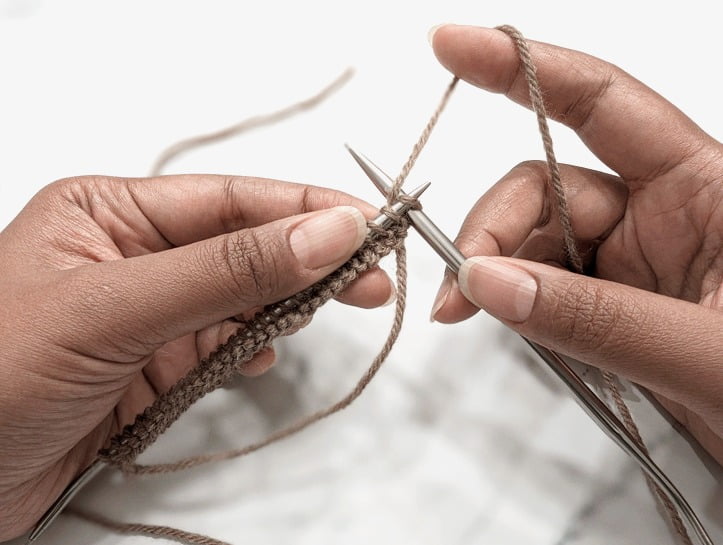
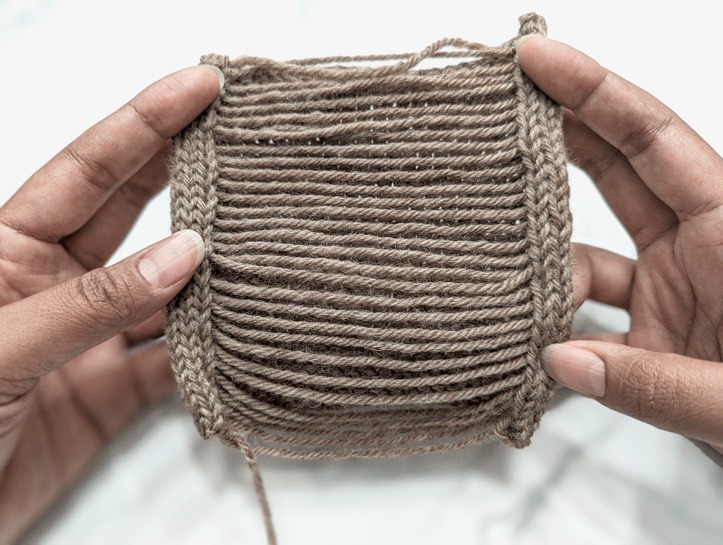
The image above shows what a circular gauge swatch looks like when knit flat. To knit a swatch like this, make sure you’re working on a pair of circular (or double pointed) needles. Since you’re only ever working on the right side in circular knitting, you’ll need to mimic this in your swatch.
Once you’ve completed casting on, slide your stitches to the other end of your needle, skipping the wrong side row altogether. Bring your working yarn from the left side of your needle to the right. Your working yarn will hang loosely, creating a long ‘float’ across the back of your swatch as you continue working only on the right side. Continue working this way until you’ve reached your desired length (remember, longer than 4 inches). Once you’ve finished working your swatch, simply cut the ‘floats’ at the back of your work down the middle and allow them to hang freely at each side.
Step #1:
Loosely cast on your desired number of stitches as you normally would.
Step #2:
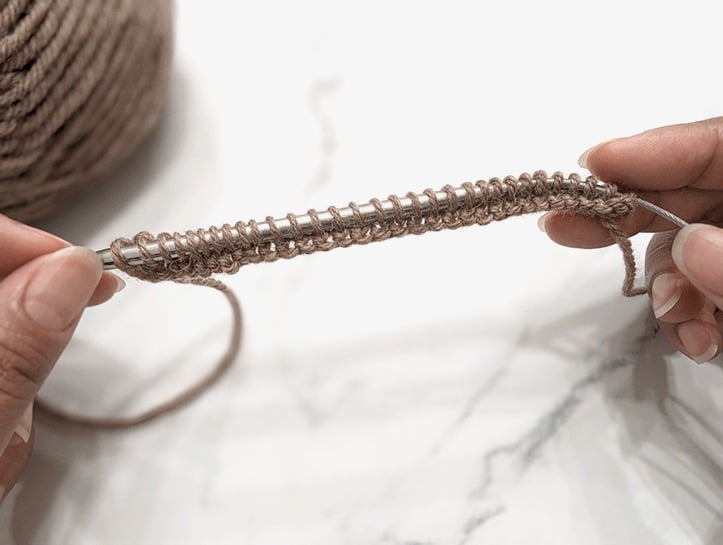
Push those stitches to the other side of your needle.
Step #3:
Note that your working yarn is now on the opposite side of your needle. Don’t fret! This is exactly what you want!
Step #4:
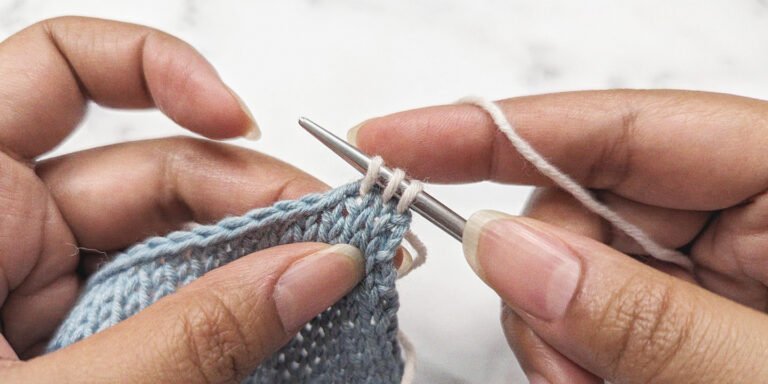
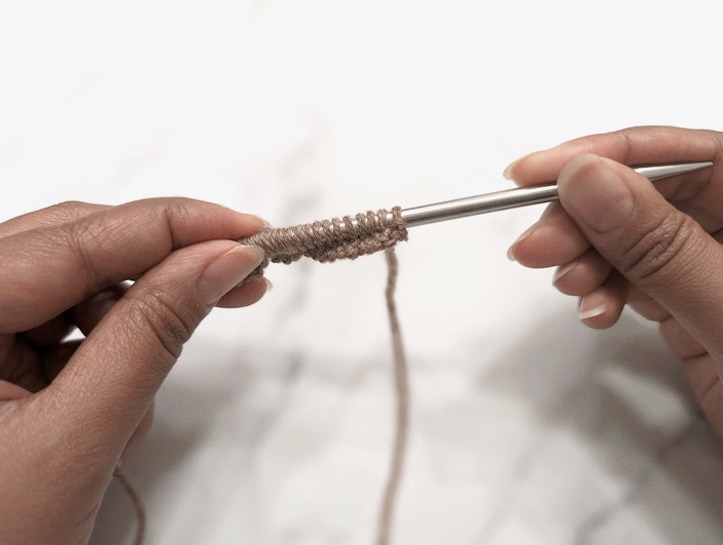
Letting the yarn strand hang loosely at the back, bring the working yarn to the tip of your needle and work the first stitch of your next row as normal on the right side.
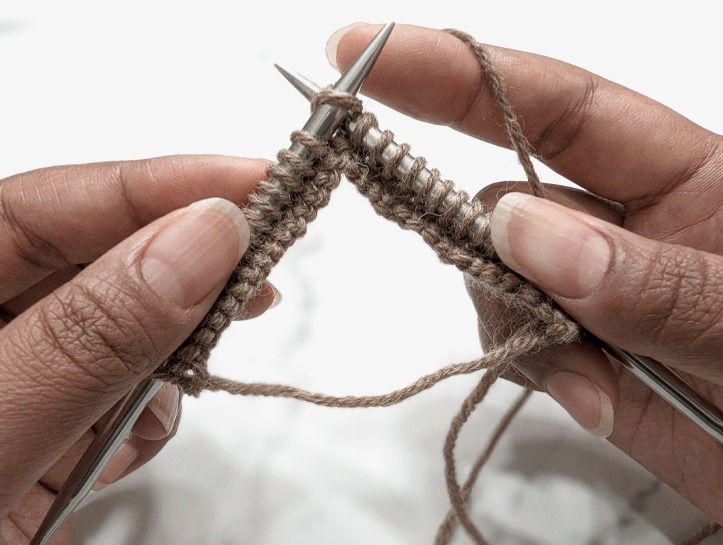
Step #5:
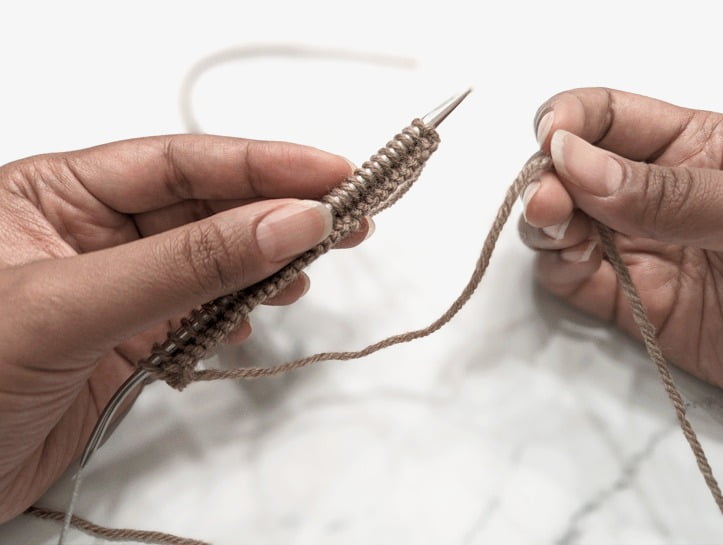
Work the rest of the row as normal. Notice the ‘float’ hanging between each end of your swatch. With each new row, you’ll be creating yet another ‘float’.
Step #6:
Keep working your swatch in the same manner, pushing your stitches to the other end of your needle, letting that float hang at the back while you continue only working on the right side.

Step #7:
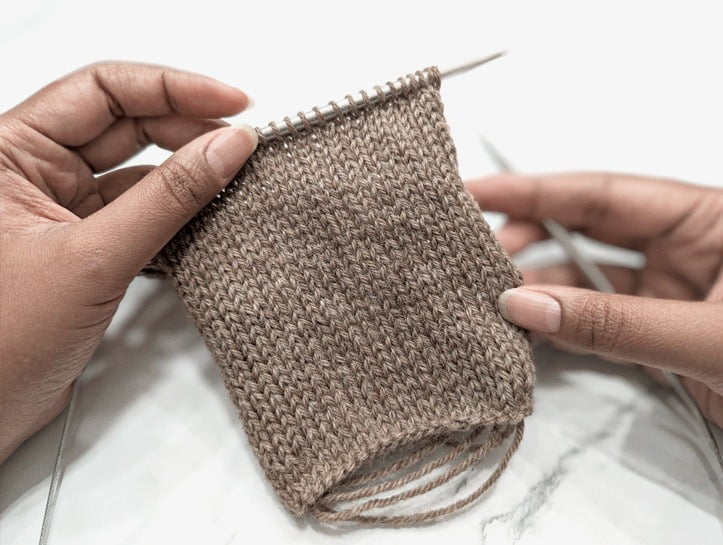
Bind off as usual.
The finished front view.
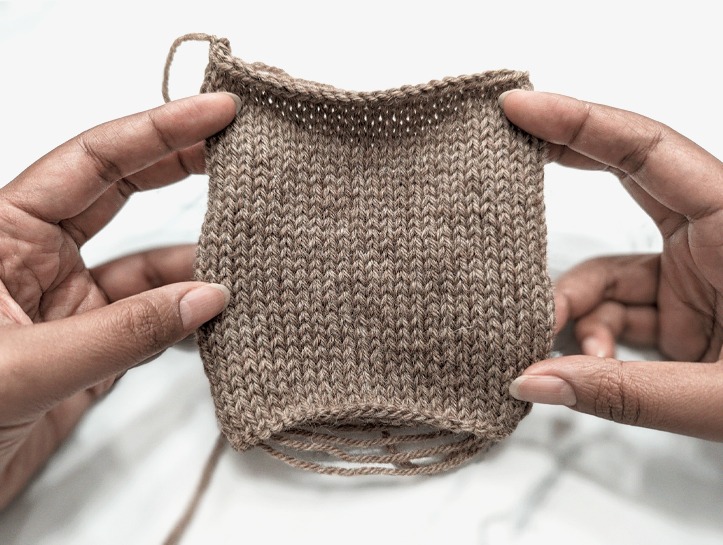
The finished back view.
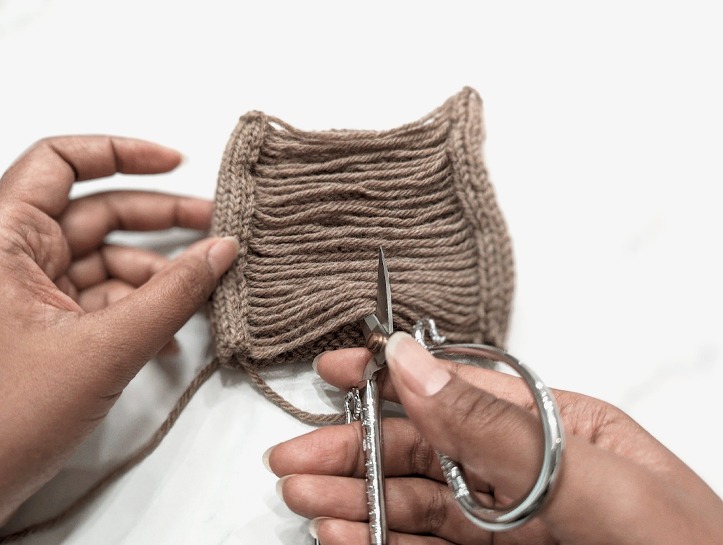
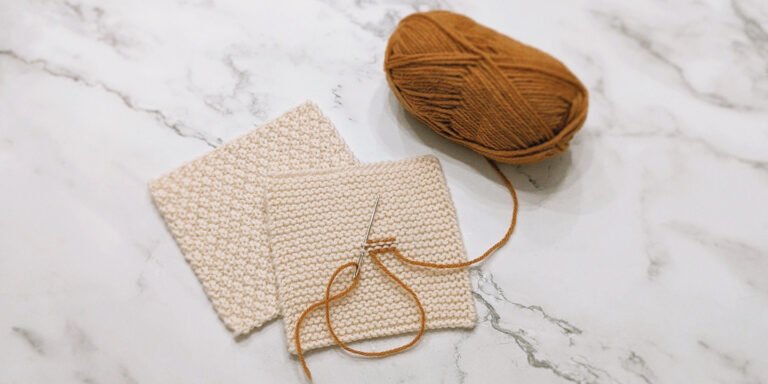
Once ready, simply snip those floats right down the middle, and you’re done!
Typically, final measurements are taken after you block your gauge swatch, but it’s a good idea to take measurements both before and after blocking. The reason for this is that fabric tends to grow or shrink a little (or a lot!) after the blocking process. If you have your unblocked gauge handy, you’ll feel a lot less like you’re shooting in the dark as you’re actually knitting your piece. You can be more confident in knowing you’re on the right track and will end up with a garment that matches the measurements you’re after.
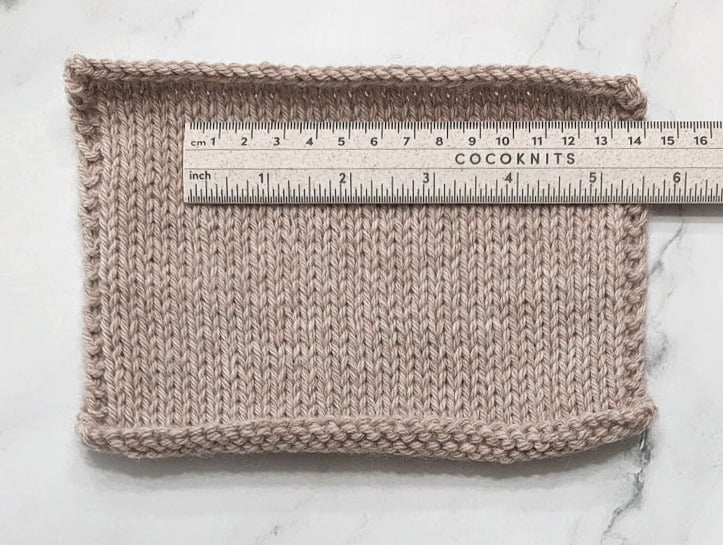
As briefly mentioned earlier, gauge is measured both in stitches (width) and in rows (length) over a 4 inch square. To measure your swatch, you can simply take a ruler or measuring tape, and count how many stitches and rows are within 4 inches. But if your knitting is anything like mine, you’ll probably find that the last stitch within that 4 inches is rarely ever a whole stitch.
So what can be done about this minor bump in the road? I love the oh so simple solution found in Amy Herzog’s Ultimate Sweater Book – instead of blindly guesstimating the fraction of that last stitch, just let your ruler do the measuring. Additionally, I like to count the maximum number of measurable stitches within my swatch, rather than just 4 inches. You’ll want to ignore a few of the edge stitches on each side, as these stitches tend to be either a bit looser or a bit tighter than the rest – which, of course, will end up providing you with inaccurate information.
To determine your gauge accurately, measure the exact width and length of as many measurable whole stitches as you can within your swatch. This usually means you’ll end up with a fractioned number.
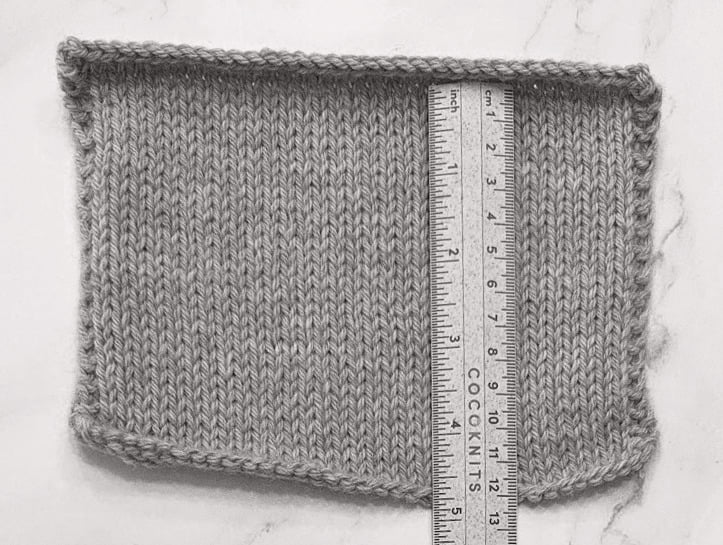
The image above shows a stitch gauge of 21 whole stitches within 4 1/8 inches. To determine how many stitches are within an inch, simply divide your stitch count by your ruler measurement:
21 / 4.125 = 5.09…
And finally, to determine how many stitches are in 4 inches, multiply this number by 4:
5.09… x 4 = 20.36…
So we end up with 20.36363636… as our stitch count. Because this is a rather wonky number, for simplicity’s sake let’s round either up or down to the nearest quarter of a fraction. I’m going to round it down to 20.25 or 20 1/4 stitches per 4 inches
The image to the left shows a stitch gauge of 21 whole stitches within 4 1/8 inches. To determine how many stitches are within an inch, simply divide your stitch count by your ruler measurement:
21 / 4.125 = 5.09…
And finally, to determine how many stitches are in 4 inches, multiply this number by 4:
5.09… x 4 = 20.36…
So we end up with 20.36363636… as our stitch count. Because this is a rather wonky number, for simplicity’s sake let’s round either up or down to the nearest quarter of a fraction. I’m going to round it down to 20.25 or 20 1/4 stitches per 4 inches
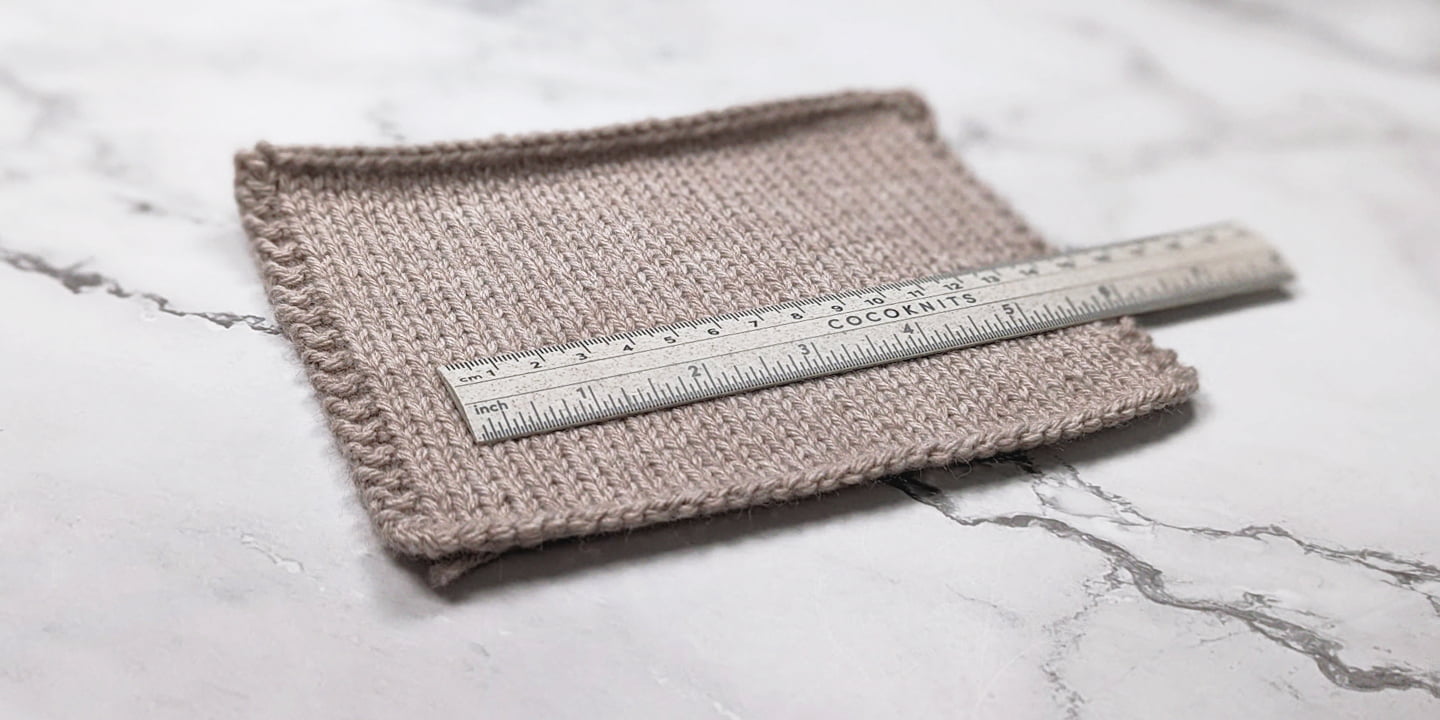
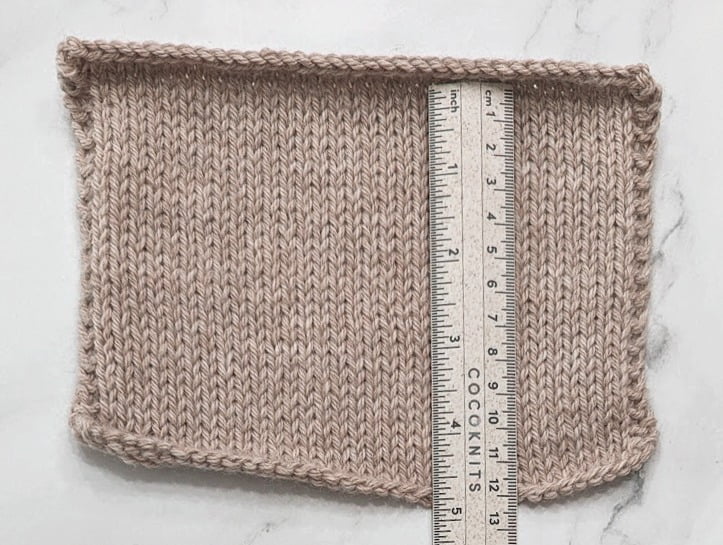
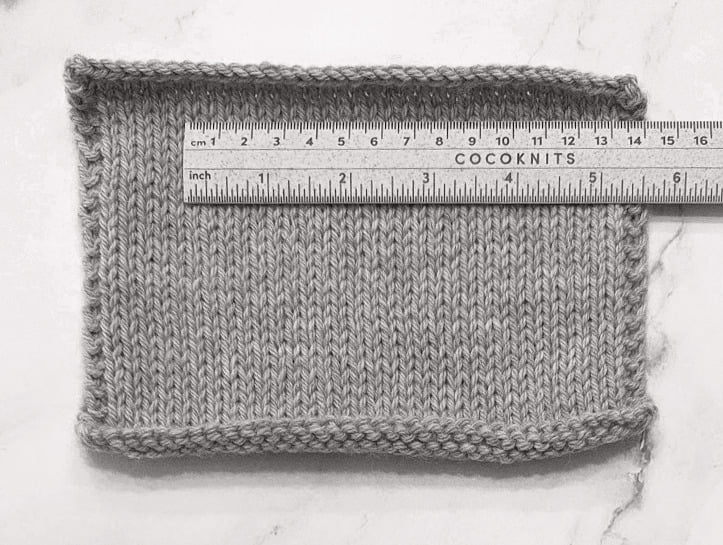
The image above shows a row gauge of 27 whole rows within 4 inches. Because we’ve already measured a whole number of rows within 4 inches here, there is really no need to do any further calculations. We’ve got our number.
The image to the left shows a row gauge of 27 whole rows within 4 inches. Because we’ve already measured a whole number of rows within 4 inches here, there is really no need to do any further calculations. We’ve got our number.
So, we’ve now determined that our 4×4 inch gauge is 20.25 stitches by 27 rows. Easy peasy, right? With a little practice, and the right strategies, measuring gauge doesn’t have to feel so tedious, after all.
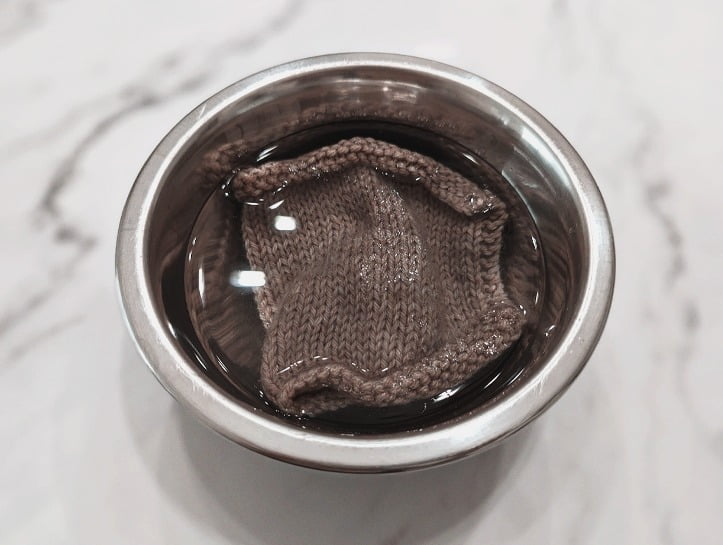
Now that we’ve determined our unblocked gauge, let’s go ahead and block our swatch.
You’ll want to block your swatch in the same manner as you intend to block your main project in order maintain some level of consistency throughout your entire process. Your fabric will behave differently depending on the method you use to block it, so keeping this level of consistency is really just good practice, and will eliminate any surprises along the way.
How do you know which blocking method to use for the fabric you’ve chosen? The simplest way to determine how to block your swatch is to take a look at your yarn label – it will nearly always include washing instructions.
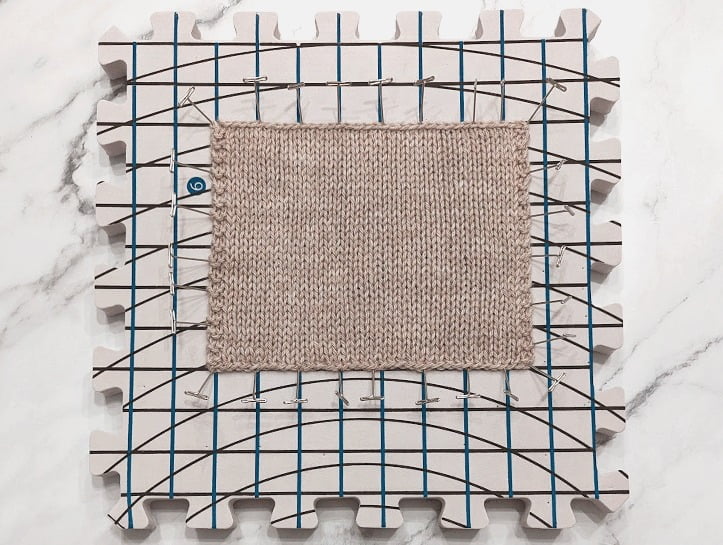
So, you’ve blocked your swatch, allowed it to dry completely, and are now ready to take its final measurements. These are the measurements you’ll be comparing to your pattern’s listed gauge.
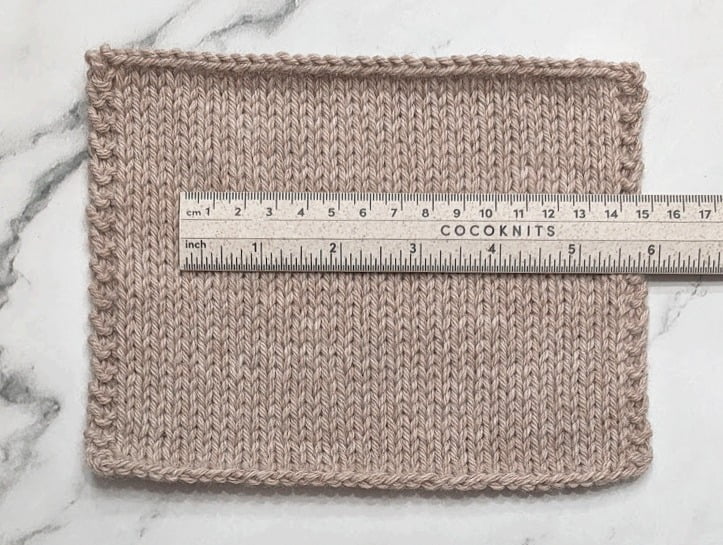

Following the exact same measuring instructions as outlined earlier, determine your stitch and row count. As you can see in the images above, my final, blocked gauge ended up being 20 stitches and 25 rows per 4 inches.
As you can see, my blocked gauge swatch ended up being slightly larger than my unblocked swatch. This is very typical of all knitted fabrics no matter the stitch pattern or yarn you’re working with. And this is a perfect illustration of why gauge is so important. The above gauge discrepancies between blocked and unblocked measurements may seem rather insignificant, but spread over a much larger area (like that of a sweater)? You can imagine how it could start to add up fairly quickly.
One final thing I’d like to note is that some resources will have you thinking that row gauge doesn’t matter all that much, and in some instances, this is true. It certainly makes this whole gauge thing a lot easier if you only have to concern yourself with stitch gauge – but the truth is, depending on your project, row gauge can, and probably will be, just as important.
Take a closer look at your intended project and you’ll be able to determine if you can get away with ignoring your row gauge. As a general rule of thumb, any area in your garment that requires any kind of vertical shaping over specific intervals will likely also require row gauge accuracy. However, if all vertical lines are knitted straight up and down, no shaping required, I think it’s pretty safe to say you can go ahead and ignore it all.
And there you have it! You’ve learned how to knit, block, and accurately measure a gauge swatch (yay!).
Knitting a gauge swatch can feel like such a drag sometimes, I know – but it really doesn’t have to be! The gauge swatch is the ultimate tool in a knitter’s toolbox. Whether you’re working from a designer’s pattern or creating your very own, your gauge swatch is going to be the very thing that saves you a whole lot of headache and wasted time – so I say give it the love and respect it deserves! Your knitting will thank you for it!